Module Introduction
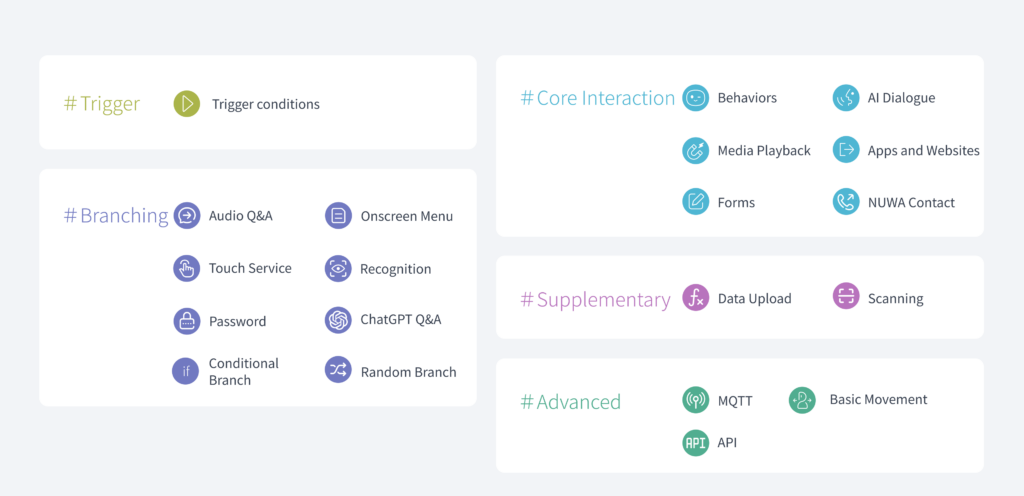
NUWA Roflow consists of five main module categories: Trigger, Branching, Core Interaction, Supplementary, and Advanced. Each module is designed to perform specific tasks.
Trigger
Trigger Conditions
When the specified condition is met, the robot starts executing the workflow, marking the beginning of the process. This module can only be placed after the “Time Period” card, and a single horizontal workflow can only have one trigger.
Branching
Audio Q&A
Used for simple Q&A with specific keyword-based questions. Multiple expected responses can be set, and the robot will respond differently based on the user’s answer, guiding them to the appropriate next action.
Onscreen Menu
Using topics and options, this module provides service guides to customers (e.g., floor guidance, meal selection), or designs questionnaires to collect customer feedback. It automatically stores their choices and preferences for service optimization.
Touch Service
When the robot is touched in a designated area, it responds according to the predefined settings. A module can include multiple ‘touch events’ to define specific touch areas and their corresponding responses. For example, you can set an event where touching the ‘head,’ ‘left hand,’ or ‘right hand’ prompts the robot to speak and perform a random action.
Recognition
Allows the robot to recognize customers using face, gender, age, and object recognition technologies. The robot will be able to identify customers, interact accurately, target information deployment, provide services, and guide to the appropriate next step.
Password
Need encryption or identity verification during the service process?
To enhance security or confidentiality, a password module can be added to the workflow. You can set up to five passwords at once and define the workflow based on correct/incorrect password entry.
ChatGPT Q&A
ChatGPT powers this module to interpret user intent and guide conversations, eliminating the need for complex keyword configurations. It handles semantic ambiguity, meeting diverse conversational needs. To use this module, create a dialogue model in the Roflow Library and ensure the robot has AI services enabled (requires a KebbiGPT subscription).
Conditional Branch
Use with variables. By comparing two custom expressions with logical operators, you can add branching conditions to the workflow and define the priority of each condition.
Random Branch
Customize multiple branching options so the robot executes a different process randomly each time. This can be used for lotteries, dice rolls, prize draws, or game designs to create more flexible robot interactions.
Core Interaction
Behaviors
Customize basic Behaviors, such as voice interactions, actions, facial expressions, or image displays.
AI Dialogue
Suitable for lively conversations and complex scenarios.
Using the NUWA AI brain or custom training in the “Trainkit,” the robot will interact based on Q&A scripts and guide conversations. It supports semantic ambiguity technology, making conversations smoother without needing every word to be exact.
Media Playback Tools
In addition to enabling the robot to display images, videos, and stream to YouTube, you can quickly access other NUWA BizTools*—Code Lab, Content Editors, Brevity, and Quiz Editors—to efficiently integrate and utilize content resources.
⚠ When using other tools’ projects, ensure to reselect and overwrite the old project in NUWA Roflow for the updates to be applied to the service flow.
* NUWA BizTools: If you have access to other BizTools, you can directly use their project files in NUWA Roflow, which the robot will automatically open during execution.
Apps and Websites
After completing the core service flow, you can design extended interactions, guiding customers to additional services. Set up a redirection to the robot app, a specific app, or a website, and configure advanced settings like switching the browser’s camera/microphone to conduct shopping guides, provide service information, or run advertisements.
NUWA Contact
Let the robot act as your operator! If a call is needed during the service, use NUWA Contact to choose specific contacts, initiate voice or video calls, and set the next action after the call is answered or missed.
Forms
Specify input formats for easy forms (text, numbers, phone numbers, email, etc.). You can also use variables to add multiple forms modules and collect a series of questions based on specific targets or situations.
Supplementary
Data Upload
Use with variables.
Once variables are added to the modules in the flow, you can use the “Data Upload Module” module to define which variables to upload and when to upload them.
Scanning
Set one or more barcodes (1D or 2D) and store the scanned barcode information with variables.
Supports the following barcode types:
- 1D Barcodes: EAN-13, EAN-8, Code 128, Code 39, Code 93, Codabar, ITF(Interleaved 2 of 5), UPC-A, UPC-E
- 2D Barcodes: QR Code, Data Matrix, PDF417, Aztec
This module uses Google’s ML Kit suite.
Copyright 2022 Google LLC. All rights reserved.
Licensed under the Apache License, Version 2.0 (the “License”); you may not use this file except in compliance with the License. You may obtain a copy of the License at http://www.apache.org/licenses/LICENSE-2.0
Unless required by applicable law or agreed to in writing, software distributed under the License is distributed on an “AS IS” BASIS, WITHOUT WARRANTIES OR CONDITIONS OF ANY KIND, either express or implied. See the License for the specific language governing permissions and limitations under the License.
Advanced
MQTT
Want to explore advanced features for IoT integration?
If you have some programming knowledge, you can use MQTT to send and receive multiple command messages, specify QoS, and the send/receive server location. During this process, you can also showcase the robot’s behavior or play media files.
Basic Movement
A movement module that applies to all NUWA robot models.
You can combine multiple movement instructions and set the speed, direction, distance, or rotation angle for each instruction to make the robot complete simple movement tasks. You can also set “Behaviors While Moving” to play images or media during movement.
API
Manage your API list in the Roflow Library.
Once an API is selected in this module, input the corresponding data (variables can be added) and execute it within the flow.
Indoor Navigation
Exclusive feature for service robots (model: Collibot).
Using SLAM technology for synchronized positioning and map construction, the robot can recognize the starting point and destination and move accurately via indoor navigation.
Make sure to choose the initial map and starting point in the project settings. Don’t forget to place the robot at the specified starting point for it to move correctly.
Which Voice Interaction Module is Right for Me?
For voice interaction scenarios, Roflow offers three main modules: Audio Q&A, AI Dialogue, and ChatGPT Q&A. Below is a comparison of the key features and conversational effects of each, so you can choose the best one for your project flow to unleash the full potential of your robot!
Audion Q&A
Suitable for simple contexts with clear question-answer keywords. For example, during a floor guide, you can set multiple expected response options: “First Floor,” “Second Floor,” or “Third Floor,” and expand the keywords based on different phrasings for each option. For example, for Option 1, you can set keywords like: “First Floor,” “First Level,” “Ground Floor,” and similarly for Options 2 and 3.
AI Dialogue
Ideal for chats and complex conversational scenarios, supporting semantic ambiguity judgments (meaning you don’t need to get every word exactly right to hit the target). This module offers a more robust conversational experience for a broader range of topics. Based on the “principal response method” you choose, it can be divided into:
(1) Default Response: The robot uses NUWA AI to determine the conversation intent, and the dialogue will behave similarly to general conversations when no Roflow project is running. If your robot has AI services (KebbiGPT), the default response will benefit from the additional ChatGPT semantic judgment, offering a smoother conversation experience!
(2) Trainkit Project: The NUWA business tool “Trainkit” is used to create a custom brand-specific language corpus. It allows you to systematically manage and apply brand-specific keywords. The robot will interact based on the Q&A script you design in the “Trainkit,” supporting a medium level of semantic ambiguity capability.
ChatGPT Q&A
This module is an upgraded version of the “Audio Q&A” module with AI capabilities. After adding AI services, this module allows your robot to utilize ChatGPT for more flexible semantic judgment and a more dynamic conversation experience. You can customize the conversation model and description text (prompt) to replace traditional keyword settings. With ChatGPT’s intent recognition, it will guide the conversation flow, providing better coverage of diverse and complex conversational contexts than the “Audio Q&A” module.
Module Editing Tutorial
Branching
Branching modules enable the robot to respond differently based on the user’s actions or answers and guide them to the designated next step.
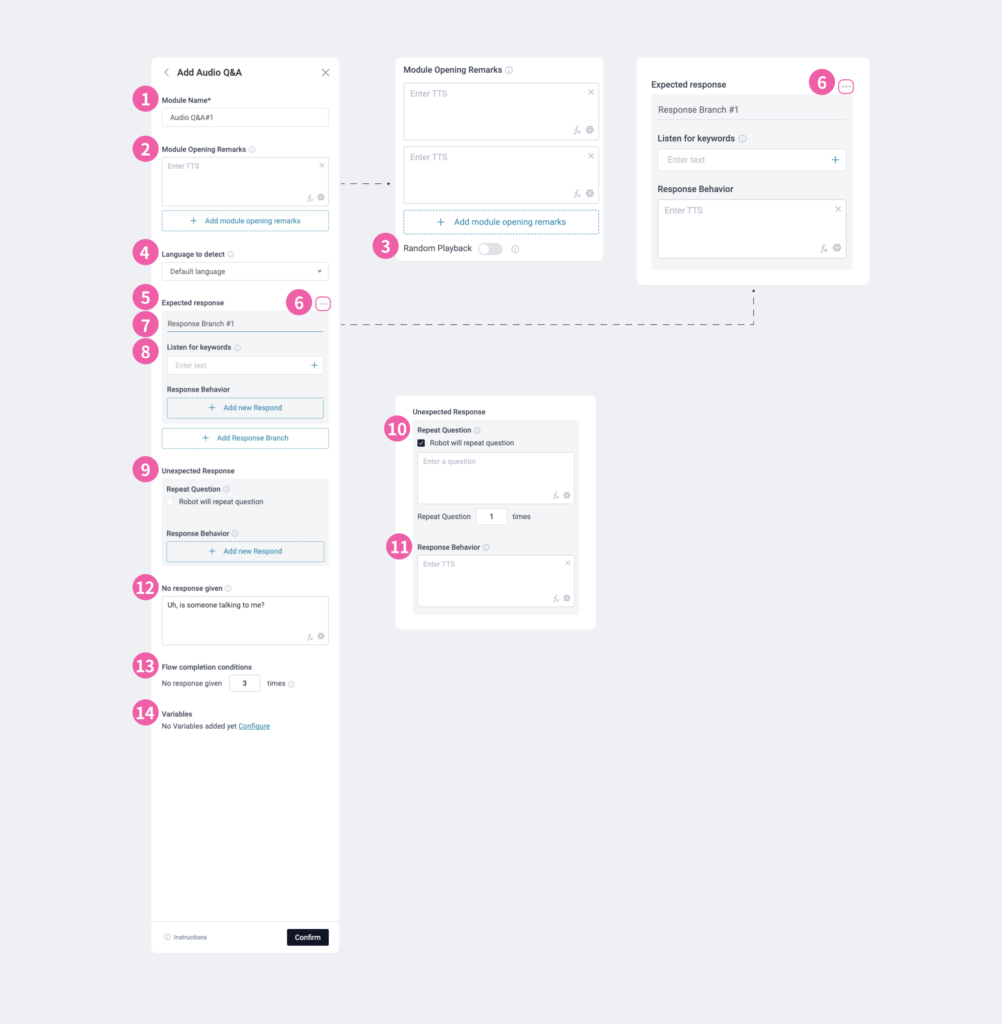
Audio Q&A
Designed for simple Q&A scenarios with specific keywords. You can set multiple expected response options, and the robot will respond accordingly and guide the user to the next step.
① Module Name: Displayed on the module card; customizable for easy identification.
② Module Opening Remarks: Set one or more Module Opening Remarks for the robot to say sequentially.
③ Random Playback: If multiple Module Opening Remarks are set, this feature enables the robot to randomly select one.
④ Language to detect: Select one language (Traditional Chinese, Simplified Chinese, English, Japanese, Korean, or Spanish [U.S.]), depending on what the robot supports.
⑤ Expected Response: Design expected answers from the user for the dialogue. The robot executes different flows based on the selected response.
⑥ Expected Response – Import/Export Corpus: Available with the PLUS Professional or Team Plan. Export Response Branch as corpus material to the Roflow Library or import existing corpus to reuse in different modules or projects.
⑦ Response Branch: Add multiple responses, each with its own set of “listening keywords” and specified “response behavior.”
⑧ Listen for Keywords: The robot only responds to content that matches the exact keyword. Multiple keywords can increase the match rate.
⑨ Unexpected Response: Scenarios where the user’s reply is outside the expected responses.
⑩ Repeat Question: Specify if the robot should repeat the question upon unexpected responses (up to 10 times).
⑪ Unexpected Response Behavior: The robot’s response after exceeding the repeat limit or receiving an unexpected reply.
⑫ No Response given: Specify how the robot reacts if the user does not reply.
⑬ Flow Completion Conditions: When the no-response count reaches the set limit, the robot will enter the “No Response” branch flow.
⑭ Variables: Add variables to this module.
Onscreen Menu
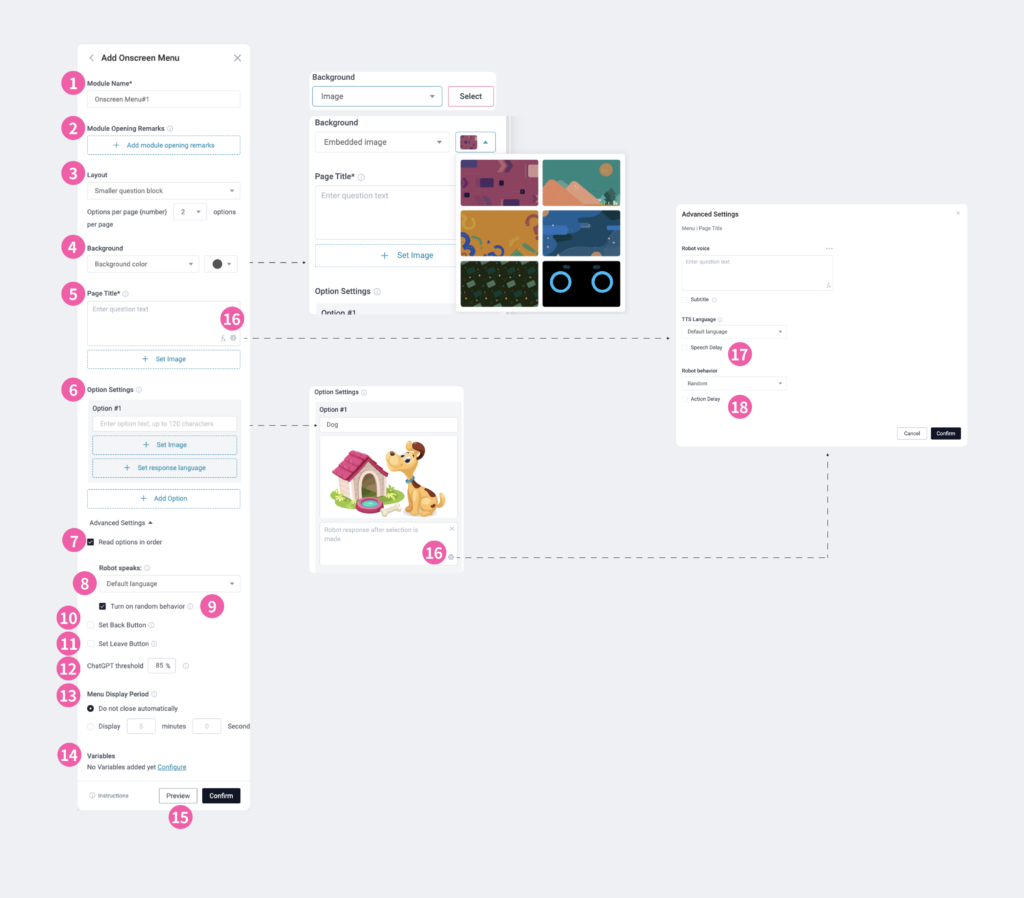
Set up questions and options to allow users to make selections via “clicking” or “voice input.”
💡 If the robot has an active AI service subscription, ChatGPT will interpret voice-selected options. In this case, the user doesn’t need to say the full option text, just the intent, to select it. Without this service, the full text must be stated for accurate selection.
① Module Name: Displayed on the module card; customizable for easy identification.
② Module Opening Remarks: Set one or more Module Opening Remarks for the robot to say sequentially.
③ Layout: Select the display ratio of questions/options and the number of options per page.
④ Background: Select a solid color or an image for the background.
⑤ Page Title: Set question text, images, or Advanced Settings ⑯.
⑥ Option Settings: Configure option text, images, reply speech*, or Advanced Settings ⑯. A maximum of 20 options can be set.
*Response Speech: The robot delivers a speech or behavior upon selecting the option.
⑦ Read Options in order: Enables the robot to read each option for auditory interaction. Configure Robot Speaking Language ⑧ and Turn on Random Behavior ⑨.
⑧ Robot Speaking Language: Choose the default language or select one language (Traditional Chinese, Simplified Chinese, English, Japanese, Korean, or Spanish [U.S.]) The supported language will align with the languages available on the robot.
⑨ Turn on Random Behavior: The robot performs random actions as options are displayed.
⑩ Set Back Button: Adds a back button on the robot’s menu to return to the previous flow.
⑪ Set Leave Button: Adds a leave button on the robot’s menu to define the flow after exiting.
⑫ ChatGPT Threshold: Customize the similarity threshold (0–100%). Lower thresholds allow broader intent matches, while higher thresholds require more exact matches.
💡 An active AI service (KebbiGPT subscription) is required to use this feature.
⑬ Menu Display Period: Set how long the menu is displayed before auto-closing. After this duration, the robot will enter the “No Response” branch flow.
⑭ Variables: Add variables to this module.
⑮ Preview: View how the menu will appear on the robot’s screen.
⑯ Advanced Settings: Configure the robot’s speech language, actions, and expressions (images not supported).
⑰ Speech Delay: Adjustable range 0.00 to 999.99 seconds
⑱ Action Delay: Adjustable range 0.00 to 999.99 seconds
Touch Service
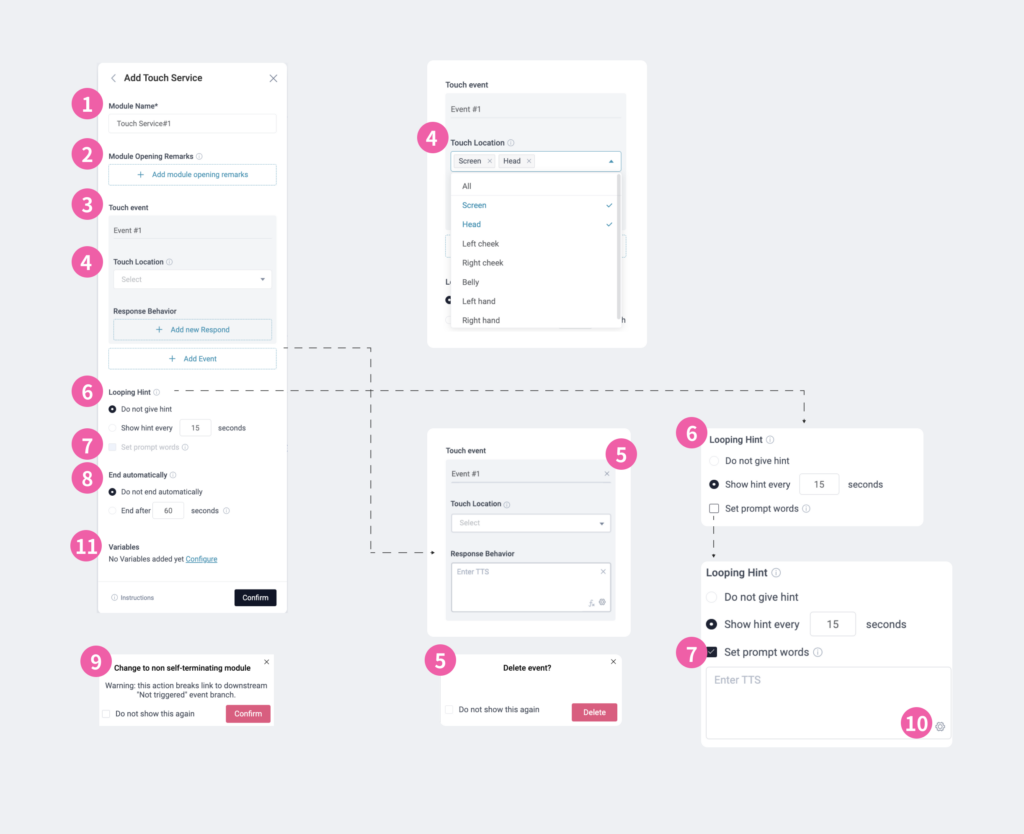
When specific areas of the robot are touched, it reacts as defined. A single module can define multiple “touch events” to assign different actions to various touch areas.
① Module Name: Displayed on the module card; customizable for easy identification.
② Module Opening Remarks: Set one or more Module Opening Remarks for the robot to say sequentially.
③ Touch Event: Define multiple events, each with its own “Touch Areas ④ ” and robot responses.
④ Touch Areas: Assign one or more areas for each event. Overlapping touch areas between events are not allowed. For Collibot, touch areas are limited to the screen (one event only).
⑤Delete Event: Events can be deleted if there is more than one.
⚠ Deleting events may affect subsequent workflows.
⑥ Looping Hint: If no designated area is touched, the robot can remind users with a prompt. Configure the duration and Prompt Text ⑦.
⑦ Prompt Words: If left blank, the prompt will use the Module Opening Remarks text.
⑧ Auto-End: If no designated area is touched, the module ends automatically. Configure the duration after which the robot enters the “No Touch” branch flow.
⑨ Disable Auto-End: Changing “Auto-End Duration” to “No Auto-End” will disable the “No Touch” branch flow.
⑩ Advanced Settings: Configure robot speech, actions, expressions, or images (applies to all modules).
⑪ Variables: Add variables to this module.
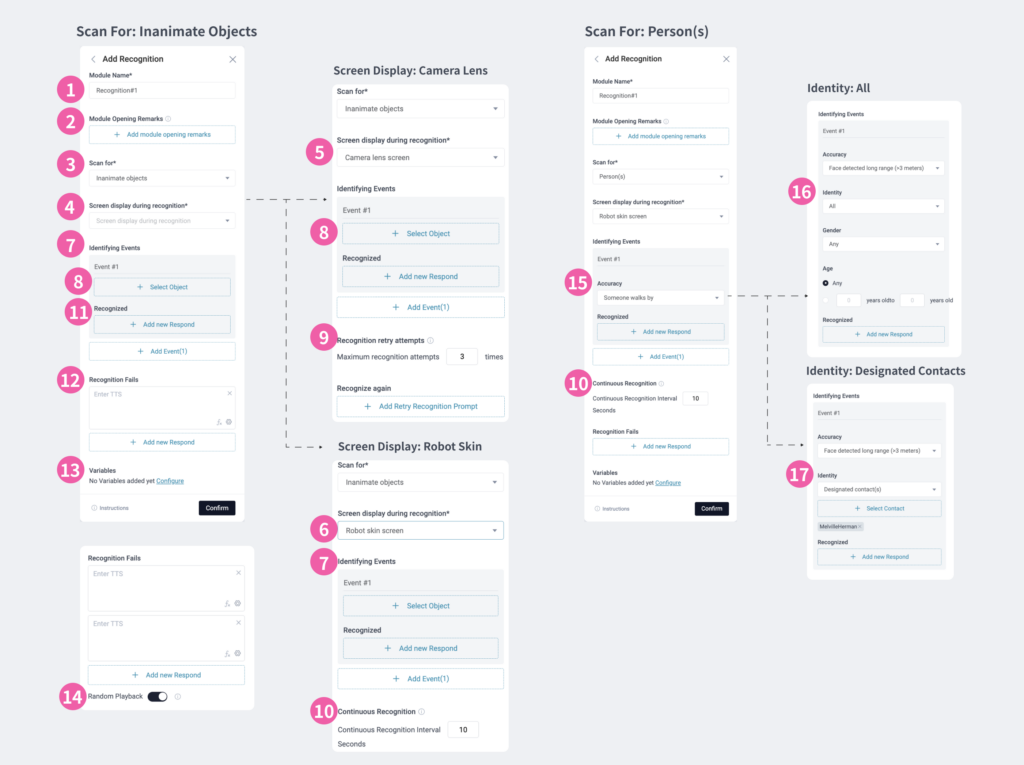
Recognition
Choose to recognize people or objects and define workflows based on recognition success/failure.
① Module Name: Displayed on the module card; customizable for easy identification.
② Module Opening Remarks: Set one or more Module Opening Remarks for the robot to say sequentially.
③ Scan For: Choose to recognize people or objects
④ Screen Display During Recognition: Display either the Camera lens screen ⑤ or the Robot skin screen ⑥.
⑤ Camera lens screen: Enable and configure Recognition retry attempts ⑨.
⑥ Robot skin screen: Enable and configure Continuous Recognition ⑩.
⑦ Identifying Events: After selecting a target, define multiple events with specific “Successful Recognition Responses.” The next flow is determined based on the recognized person/object.
⑧ Select Object: For object recognition, choose built-in objects from the Roflow Library or upload training files from Google’s Teachable Machine*.
⑨ Recognition Retry Attempts: Set the number of retries. If the maximum is reached without success, it is considered a failure.
⑩ Continuous Recognition: Define the recognition duration (3–99 seconds). Exceeding this duration results in failure.
⑪ Recognized: Add robot responses for each successful recognition event.
⑫ Recognition Fails: Specify robot responses for recognition failures.
⑬ Variables: Add variables to this module.
⑭ Random Playback: If multiple responses are added, the robot can randomly select one.
⑮ Accuracy: The accuracy options for face detection include “Face detected long range” (> 3 meters), “Face detected mid-range” (≤ 3 meters), and “Face detected close range” (≤ 1 meter). These settings can also be configured in the “Identity” section.
⑯ Identity – All: Configure “Gender” and “Age.”
⑰ Identity – Designated Contacts: Select one or more “Trained Individuals**.”
* Teachable Machine: An open-source tool developed by Google that requires no programming experience, enabling anyone to perform AI object training using a computer’s webcam. It allows for quick and easy creation of robot learning models. When training objects with Teachable Machine, it is recommended to include image samples for both the “objects to be recognized” and the “no object” class to improve recognition accuracy.
**Face Recognition Training: Add individual profiles and train facial images in the Roflow Library under “Manage Contacts”.
Password
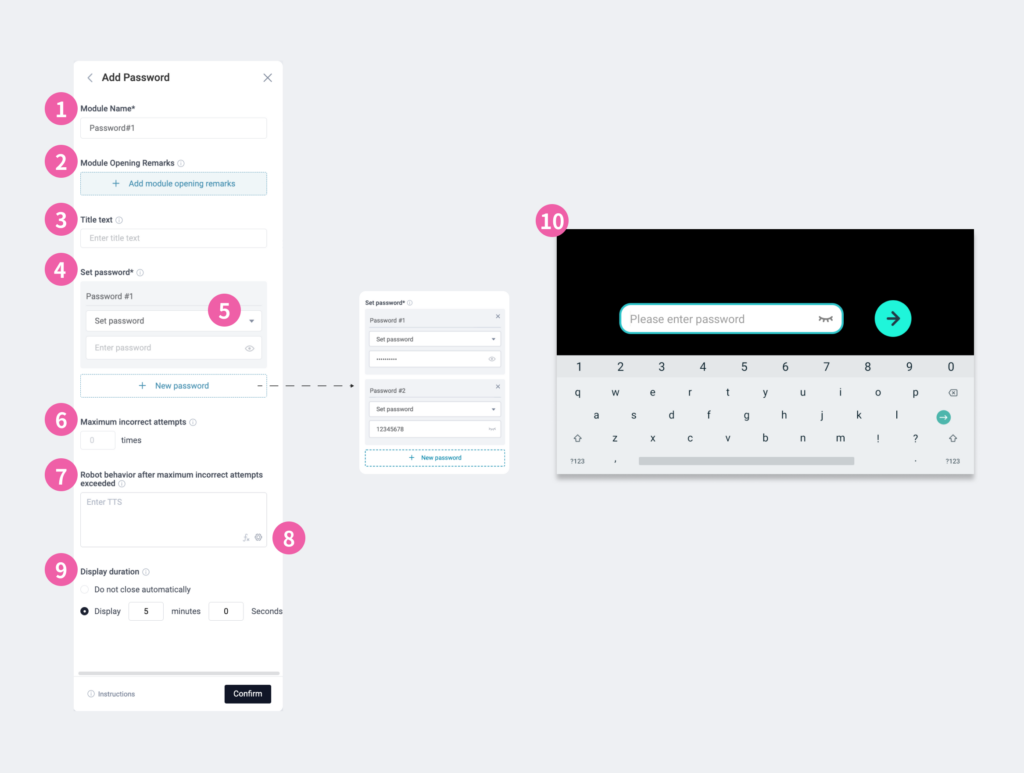
Need encryption or identity verification during the service process? To enhance security or confidentiality, you can add a Password module to the flow. You can set up to five passwords and define the flow based on correct or incorrect password input.
① Module Name: Displayed on the module card; customizable for easy identification.
② Module Opening Remarks: Set one or more Module Opening Remarks for the robot to say sequentially.
③ Title Text: Displayed on the robot or second screen for the password inputter to view, up to 120 characters.
④ Set Password: Passwords must be 4–10 alphanumeric characters. You can set 1–5 passwords.
⑤ Options: Choose between “Set Password” or “Apply Custom Loop Variable (future feature).
⑥ Maximum incorrect attempts: Specify whether retries are allowed when the password is entered incorrectly. A maximum of 10 retries is supported.
⑦ Behaviors after maximum incorrect attempts exceeded: Define the robot’s behavior when the retry limit is reached or when no action is taken for 5 minutes.
⑧ Advanced Settings: Configure robot speech language, actions, expressions, or images. These are general settings applicable to all modules.
⑨ Display Duration: Choose “Do not close automatically” or set a duration. If the display time is exceeded, the robot will enter the “No Response” branch flow.
⑩ Robot Display for This Module: The robot’s screen interface when this module is in use.
ChatGPT Q&A
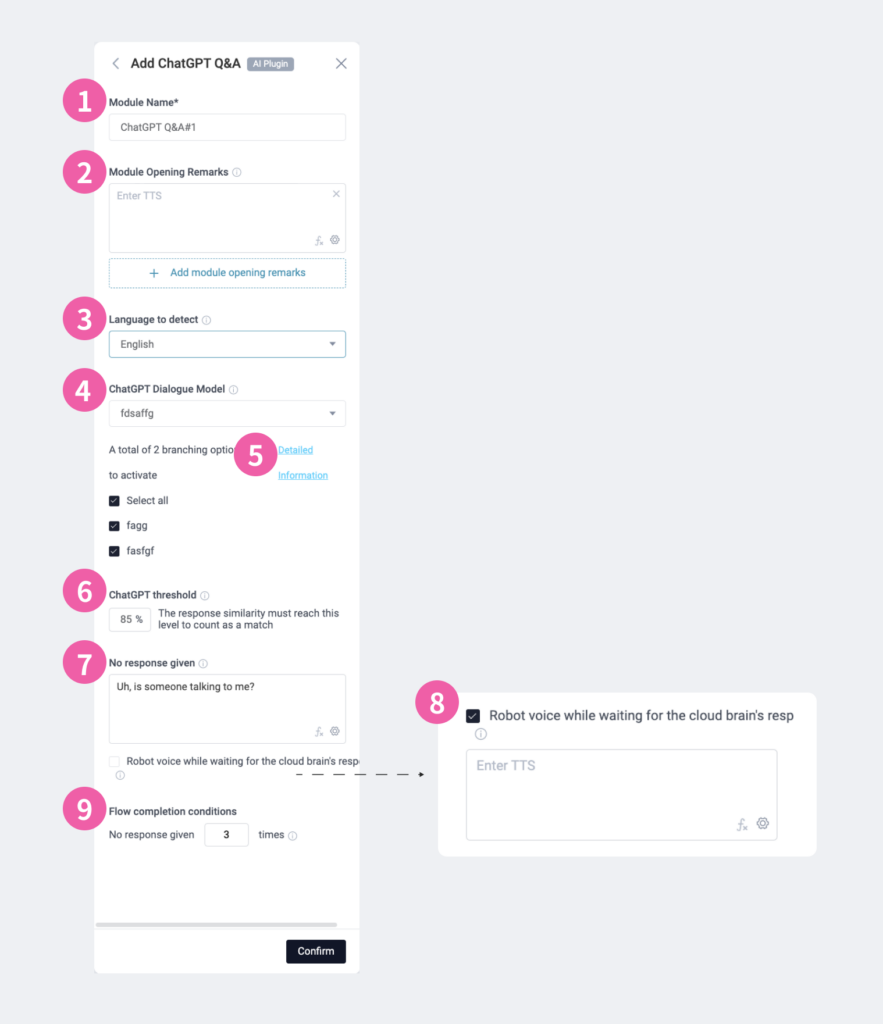
This module uses ChatGPT to determine the user’s intent and guide the appropriate conversational flow. To use this module, create a custom dialogue model in the Roflow Library and pair it with a robot equipped with AI services (KebbiGPT subscription).
① Module Name: Displayed on the module card; customizable for easy identification.
② Module Opening Remarks: Set one or more Module Opening Remarks for the robot to say sequentially.
③ Language to detect: Choose one language: Chinese, English, Japanese, or Korean, depending on what the robot supports.
④ ChatGPT Dialogue Model: Select a custom dialogue model from the Roflow Library. Once selected, you can choose options to include for judgment.
⑤ Detailed Information: Click to expand the side window, displaying options and their corresponding description text.
⑥ ChatGPT Threshold: Set a similarity threshold (0–100%). Test the conversation on the robot to determine the optimal setting.
💡 A higher threshold requires stricter matching of the prompt and input, resulting in fewer matches (lower semantic flexibility); A lower threshold increases semantic flexibility but may result in more errors.
⑦ No Response given: Define how the robot responds when the user does not reply.
⑧ Robot while waiting for the cloud response: After receiving the user’s input, the robot will play a voice message to maintain interaction while awaiting the cloud brain’s analysis and response.
⑨ Flow completion conditions: When the no-response count reaches the set limit, the robot enters the “No Response” branch flow.
Conditional Branching
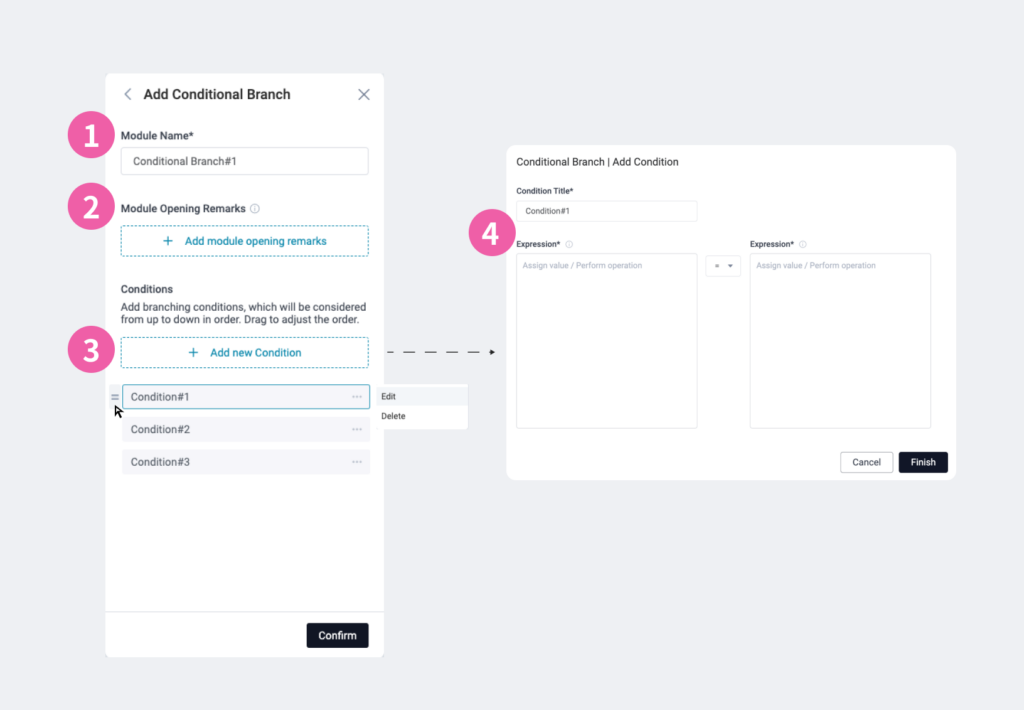
Use this module with variables to add branching conditions based on logical comparisons of two custom expressions (Expressions). You can also define the priority order of each condition.
① Module Name: Displayed on the module card; customizable for easy identification.
② Module Opening Remarks: Set one or more Module Opening Remarks for the robot to say sequentially.
③ Conditions: Add branching conditions, which will be evaluated in order from top to bottom. Drag and drop to adjust the priority.
④ Input Expression: Input {{}} to declare variables for assignment or calculation.
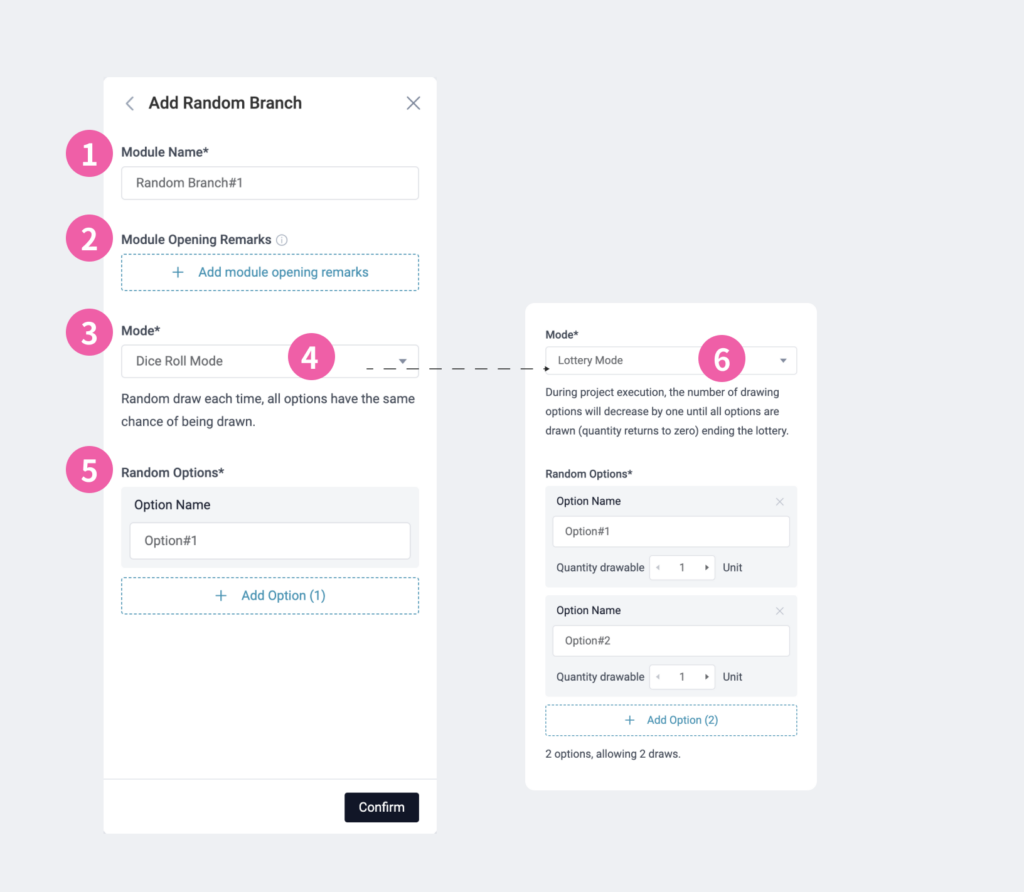
Random Branching
Customize multiple branching options to make the robot execute a different flow randomly each time. This module is ideal for lotteries, dice rolls, prize draws, or game designs, creating more flexible robot interactions.
① Module Name: Displayed on the module card; customizable for easy identification.
② Module Opening Remarks: Set one or more Module Opening Remarks for the robot to say sequentially.
③ Mode: Choose between “Dice Roll” or “Lottery.”
④ Dice Roll Mode: Customize options and names. All options have an equal chance of being selected.
⑤ Random Options: Customize the number of options and their names.
⑥ Lottery Mode: Customize the number of options and their names. You can set different quantities available for each option.
Core Interaction
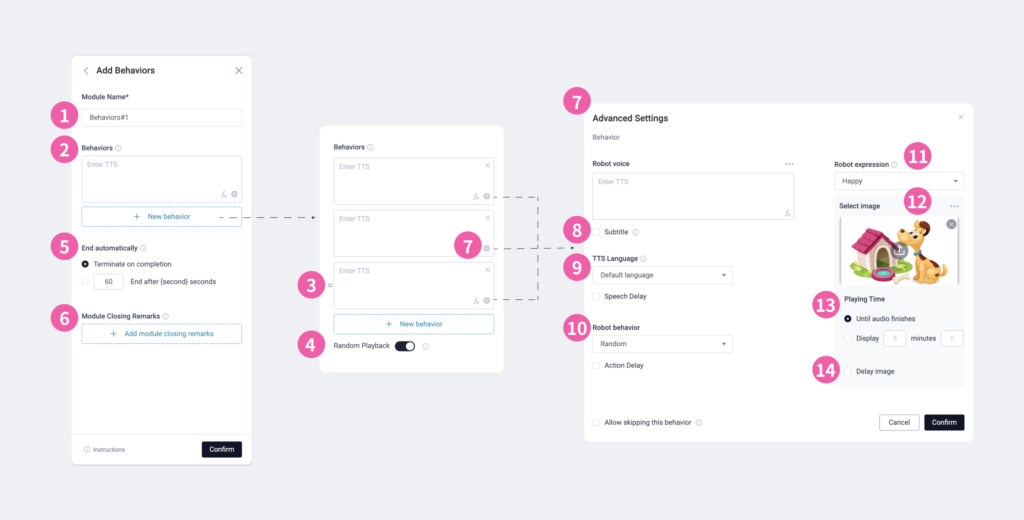
Behaviors
① Module Name: Displayed on the module card; customizable for easy identification.
② Behaviors: Define one or more behaviors for the robot to execute sequentially.
③ Reorder Behaviors: Drag and drop to adjust the execution order.
④ Random Playback: Let the robot randomly execute one behavior if multiple behaviors are defined.
⑤ End automatically: If a duration is set, the module ends when the time is up, regardless of whether all behaviors are completed.
⑥ Module Closing Remarks: Set one or more Module Closing Remarks for the robot to say sequentially.
⑦Advanced Settings: Configure robot speech language, actions, expressions, images, or videos.
⑧ Subtitles: By default, subtitles match the speech content, but they can be customized.
⑨ TTS Language: Choose from supported languages. Optionally set speech delay (0.00–999.99 seconds).
⑩ Robot Behavior: Choose from random, custom, or no actions. Optionally set action delay (0.00–999.99 seconds).
⑪ Robot Expressions: Set a robot expression or media file.
⑫ Add Media File: Upload images/videos or provide a link. Supported image formats: JPG, JPEG, PNG, GIF, WebP. Supported video formats: MP4, WAV.
⑬ Image/Video Playing Time: Set “Until audio finishes” or a fixed duration.
⑭ Image/Video Delay: Configure delay in seconds (0.00–999.99).
AI Dialogue
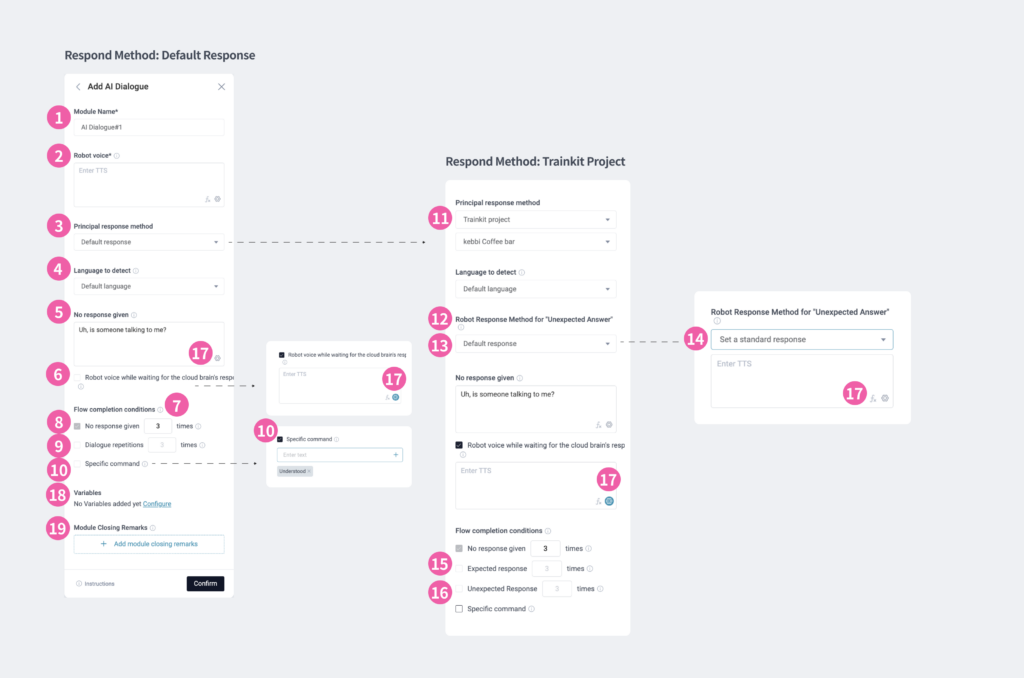
Response Method | Default Response
① Module Name: Displayed on the module card; customizable for easy identification.
② Robot Voice: Enter a speech response for the robot to guide the dialogue.
③ Principal Response Method: Choose between “Default Response” or “⑪ Trainkit Project.”
④ Language to Detect: Choose one language from Traditional Chinese, Simplified Chinese, English, Japanese, Korean, or Spanish (U.S.), based on the robot’s supported languages.
⑤ No Response Given: Define how the robot should respond when the user does not reply.
⑥ Robot Voice While Waiting for Cloud Brain’s Response: The robot plays this voice message after receiving the user’s reply, maintaining interaction while the cloud brain analyzes and responds.
⑦ Flow Completion Conditions: Set multiple conditions to end the flow when any condition is met.
⑧ No Response given: Required. Define the maximum number of times a user can fail to reply before the flow ends.
⑨ Dialogue Repetitions: Define the maximum number of exchanges between the user and robot to end the flow. For single-turn data, each user response counts as one turn; for multi-turn data, completing a conversation counts as one turn.
⑩ Specific Commands: Set one or more commands that will immediately end the flow when the robot hears any of them.
Response Method | Trainkit Project
⑪ Trainkit Project: Select a pre-created project. This feature requires the “Trainkit” tool from NUWA BizTools.
⑫ Robot Response Method for “Unexpected Answer”: Define how the robot should respond to answers outside the “Trainkit Project” content. Choose “⑬ Default Response” or “⑭ Set a standard response
⑬ Unexpected Answer | Default Response: The response content is provided by NUWA AI, supporting dynamic dialogue and casual chats, but without strict content control.
⑭ Unexpected Answer | Standard Response: Define the response content to maintain full control over the robot’s replies.
⑮ Flow completion conditions | Expected Response: End the flow after a defined number of replies that match the “Trainkit Project” content.
⑯ Flow completion conditions | Unexpected Response: End the flow after a defined number of replies that do not match the “Trainkit Project” content.
⑰ Advanced Settings: Configure robot speech language, actions, expressions, or images. These are general settings applicable to all modules.
⑱ Variables: Add variables to this module.
⑲ Module Closing Remarks: Set one or more Module Closing Remarks for the robot to say sequentially
* Triankit: If you have access to this tool, you can access its project files in NUWA Roflow.
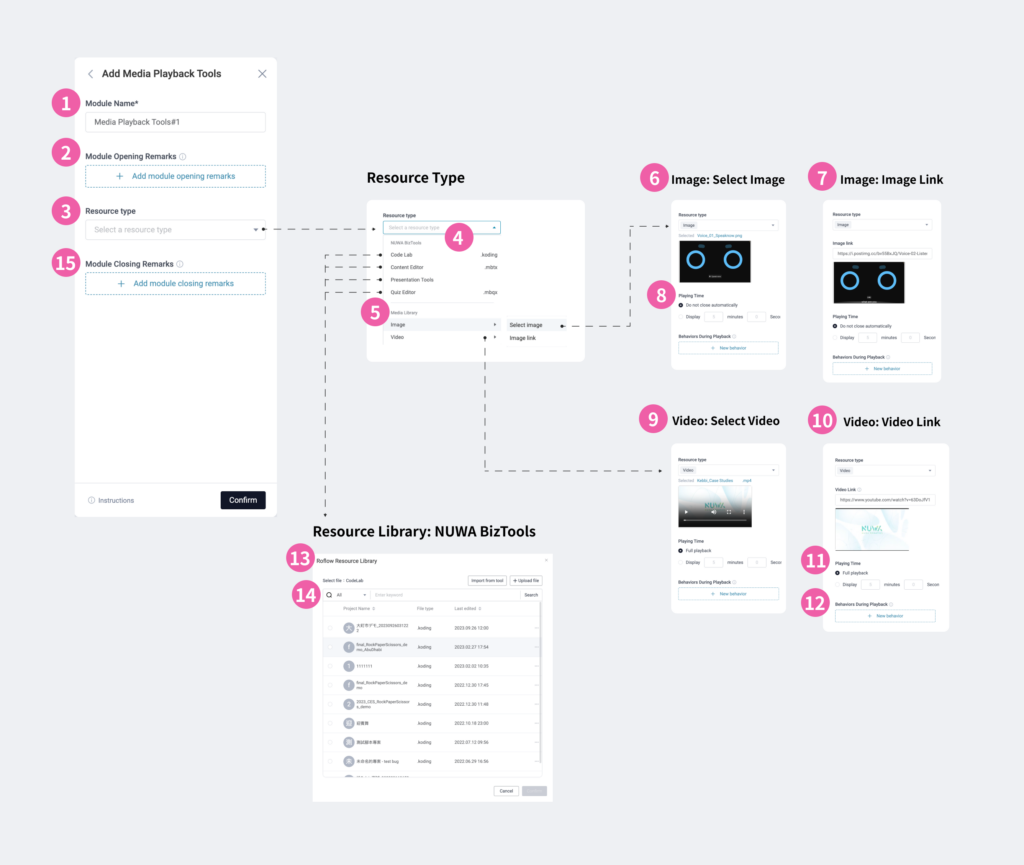
Media Playback Tools
① Module Name: Displayed on the module card; customizable for easy identification.
② Module Opening Remarks: Set one or more Module Opening Remarks for the robot to say sequentially.
③ Resource Type: Choose between two main categories: “④ NUWA BizTools” and “⑤ Media Roflow Library.”
④ NUWA BizTools: Includes tools like Code Lab, Content Editor, Brevity, and Quiz Editor. If you have access, quickly retrieve resources. Ensure updated resources are reselected in NUWA Roflow to apply changes to the service flow.
⑤ Media Library: Upload or link to images and videos.
⑥ Select Image: Upload an image in JPG, JPEG, PNG, GIF, or WebP format.
⑦ Image Link: Paste a link to an image.
⑧ Playing Time: Choose “Do not close automatically” or set a specific duration (min: sec).
⑨ Select Video: Upload a video in MP4 or MOV format.
⑩ Video Link: Paste a link to a video. YouTube is supported, but note:
⚠️ Restricted content like YouTube Kids, age-restricted, or copyright-restricted videos cannot be played. Upload such videos to the Roflow Library and use the “Media Playback Tools” module for playback.
⑪ Playing Time: Choose “Full Playback” or set a specific duration (min: sec).
⑫ Behaviors During Playback: Assign 0–20 robot actions to play in sequence alongside the image or video.
⑬ Import Files: Retrieve project files from NUWA BizTools based on the selected tool
⑭ Search: Enter project name keywords for quick search.
⑮ Module Closing Remarks: Set one or more Module Closing Remarks for the robot to say sequentially.
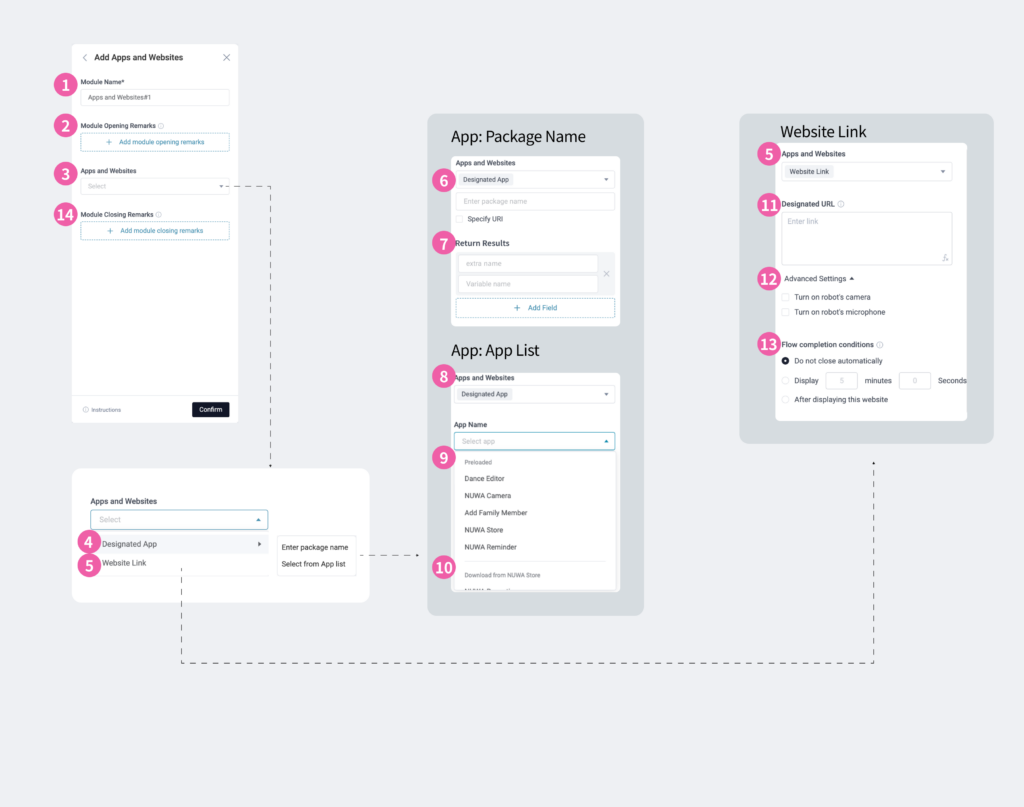
Apps and Websites
① Module Name: Displayed on the module card; customizable for easy identification.
② Module Opening Remarks: Set one or more Module Opening Remarks for the robot to say sequentially.
③ Apps and Websites: Choose between “Designated App ④” or “Website Link ⑤.”
④ Designated App: Choose “Enter Package Name ⑥” or “Select from App List ⑧.
⑤ Website Link: Specify a URL and set the display duration.
⑥ Designated App | Input Package Name: Optionally input a URL.
⑦ Designated App | Return Results: Support extra keys to retrieve app responses and store them in variables. Add multiple return fields, ensuring unique extra names and variable assignments.
⑧ Designated App | Select from App List: Choose “Preloaded ⑨” or “Download from NUWA Store ⑩.
⑨ Preloaded: Select apps like Dance Editor, NUWA Camera, Add Family Member, NUWA Store, or NUWA Reminder.
⑩ Download from NUWA Store: Choose apps like NUWA Reception, NUWA Ocular, Koding Land, or AI Training School (requires prior download from the NUWA Store).
⑪ Website Link | Designated URL: Add variables or parameters after the link.
⑫ Website Link | Advanced Settings: Set the browser to turn on the camera/microphone or not.
⑬ Website Link | Flow Completion Conditions: If any of the conditions other than “Do not close automatically” are met, the process will end.
⑭ Module Closing Remarks: Set one or more Module Closing Remarks for the robot to say sequentially.
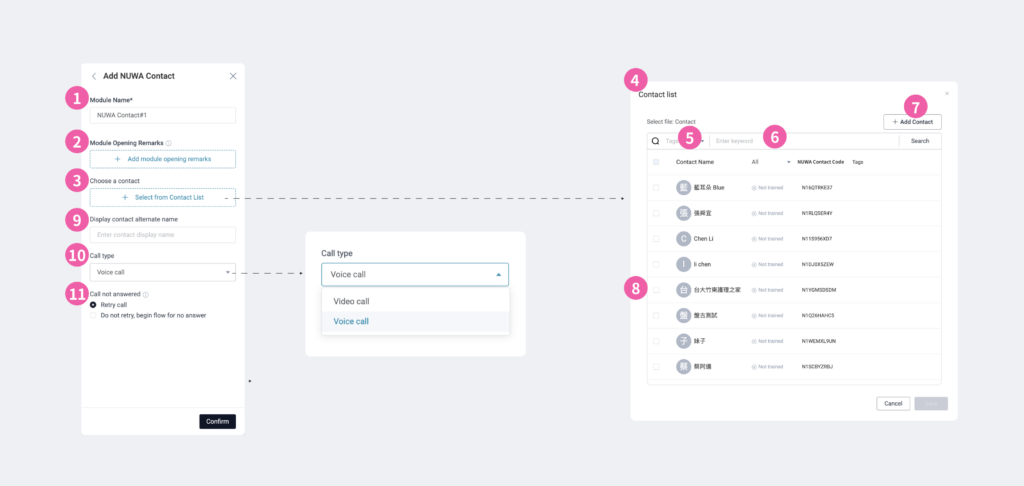
NUWA Contact
① Module Name: Displayed on the module card; customizable for easy identification.
② Module Opening Remarks: Set one or more Module Opening Remarks for the robot to say sequentially.
③ Choose a contact: Choose one contact.
④ Contact list from Roflow Library: Select a contact from previously created contact files.
⑤ Tag Search: Filter contact by tags.
⑥ Keyword Search: Search contact by name keywords.
⑦ Add Contact: Go to the Roflow Library to create new contact files.
⑧ Select Contact: Only contact with a “NUWA Contact Number” can be chosen.
⑨ Display Contact Alternate Name: The name displayed on the robot’s screen for the contact.
⑩ Call Type: Choose “Video Call” or “Voice Call.”
⑪ Call Not Answered: Define whether to allow redialing or proceed directly to the “No Response” flow.
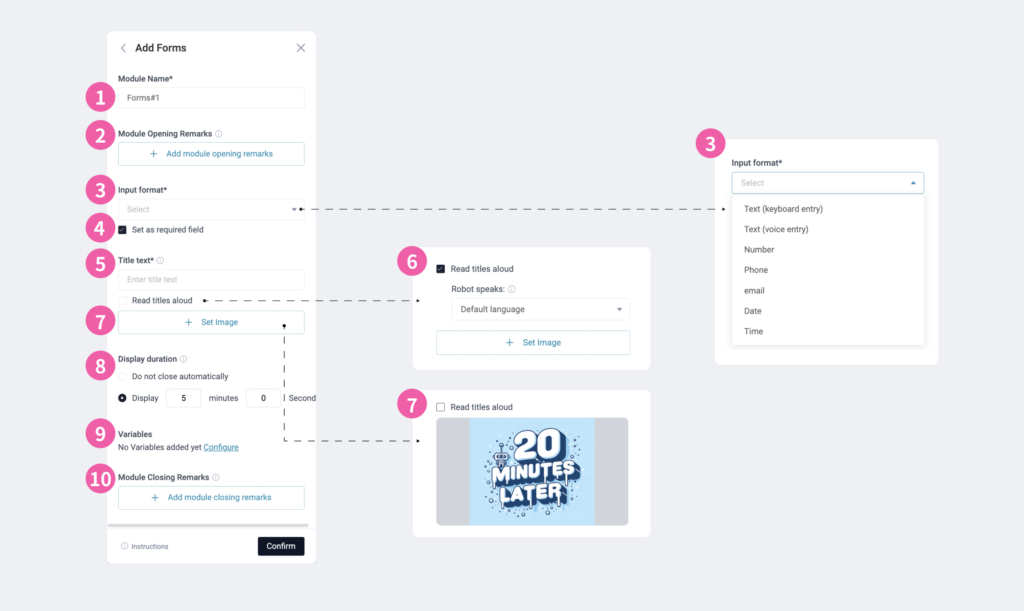
Forms
① Module Name: Displayed on the module card; customizable for easy identification.
② Module Opening Remarks: Set one or more Module Opening Remarks for the robot to say sequentially.
③ Input Format: Choose from seven formats.
④ Set as Required Field: If unchecked, the robot screen will display a skip button, allowing users to skip the input.
⑤ Title Text: Displayed on the robot or second screen for the forms user to view, up to 120 characters.
⑥ Reads Title Aloud: Enable the robot to read the title content in a supported language.
⑦ Set Image: Attach an image from the Roflow Library or upload one.
⑧ Display Duration: Choose “Do not close automatically” or set a specific duration. Exceeding this duration returns the robot to its initial state.
⑨ Variables: Add variables to this module.
⑩ Module Closing Remarks: Set one or more Module Closing Remarks for the robot to say sequentially.
Supplementary
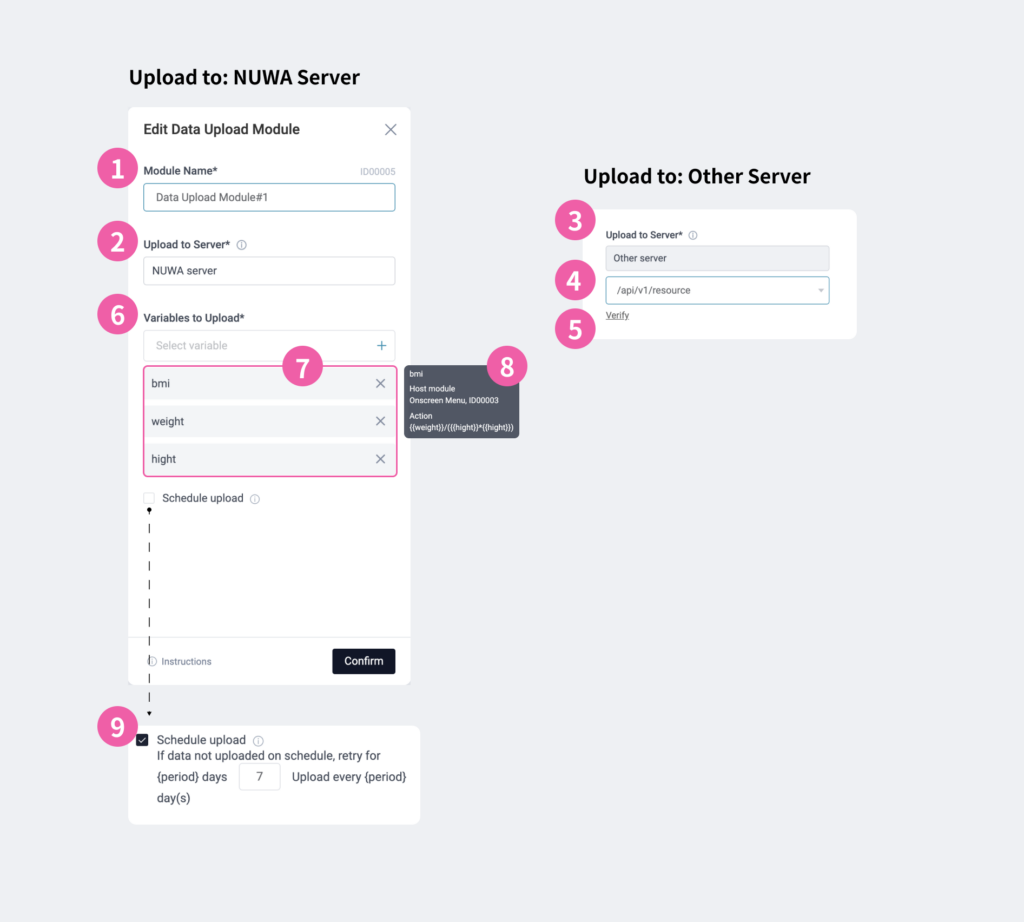
Data Upload Module
① Module Name: Displayed on the module card; customizable for easy identification.
② Upload to Server: Select to upload variable results to “② NUWA Server” or “③ Other Servers.” This setting is synchronized with “Project Settings | Advanced Settings | Variable Storage Location.
③ Other Servers: If selecting another server, configure the upload path.
④ Upload Path: Choose from pre-configured paths. To add new paths, go to “Project Settings | Advanced Settings | Variable Storage Location.
⑤ Verify Path: After selecting an upload path, verify its functionality in real time.
💡 Validation only confirms the current status of the path. Final functionality depends on the robot’s operation.
⑥ Variables to Upload: Select “Available Variables in Current Flow” to upload.
⑦ Selected Variables: Once variables are chosen, they are displayed in a list.
⑧ Variable Details: Hover over a variable to view details, including associated module names, IDs, and actions.
⑨ Schedule Upload: Specify an upload deadline between 1–30 days. If uploading fails, the robot will retry until successful within the set timeframe.
Scanning
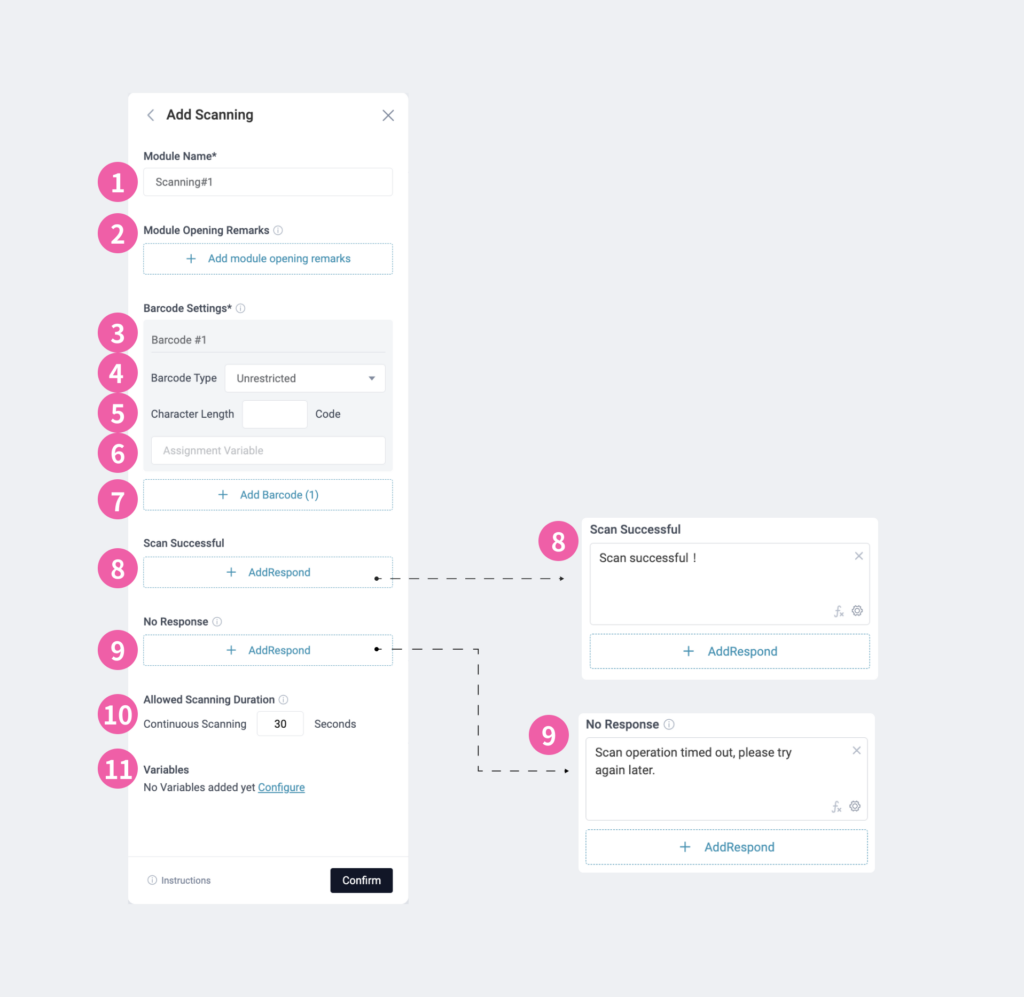
Supports scanning one or more barcodes. When multiple barcodes are set, all must be scanned for success. Conditions for each barcode must not overlap. Supported barcode types:
1D Barcodes: EAN-13, EAN-8, Code 128, Code 39, Code 93, Codabar, ITF (Interleaved 2 of 5), UPC-A, UPC-E
2D Barcodes: QR Code, Data Matrix, PDF417, Aztec
① Module Name: Displayed on the module card; customizable for easy identification.
② Module Opening Remarks: Set one or more Module Opening Remarks for the robot to say sequentially.
③ Barcode Name: Customize the barcode name (max 36 characters).
④ Barcode Type: Choose “All Supported Types,” “1D Barcode,” or “2D Barcode.
⑤ Character Length: Specify length (4–99,999 characters). Required when multiple barcodes of the same type are added.
⑥ Assignment Variable: Store barcode data in a variable (type: string). Variables cannot be duplicated within the module.
⑦ Add Barcode: Add at least one barcode, up to 20.
⑧ Scan Successful: Optional. Specify Behaviors upon successful scanning.
⑨ No Response: Optional. Specify Behaviors if no response is received.
⑩ Allowed Scanning Duration: Set scanning duration (3–99 seconds). The robot’s camera remains active, and failure to scan within the time will trigger the “No Response” flow.
⑪ Variables: Add variables to this module.
⚠️ If more than one barcode is set, the barcode names and assigned variables must not duplicate, and their settings must not overlap or intersect.
For example, when configuring two barcodes:
•1D, 12 characters; 2D, 12 characters ✅
•1D, 12 characters; 1D, 10 characters ✅
•No restrictions, 12 characters; no restrictions, 10 characters ✅
•1D, 12 characters; 2D, unspecified ✅
•No restrictions, 12 characters; 2D, 12 characters ⛔️
•2D, 12 characters; 2D, unspecified ⛔️
Advanced Modules
MQTT
① Module Name: Displayed on the module card; customizable for easy identification.
② Module Opening Remarks: Set one or more Module Opening Remarks for the robot to say sequentially.
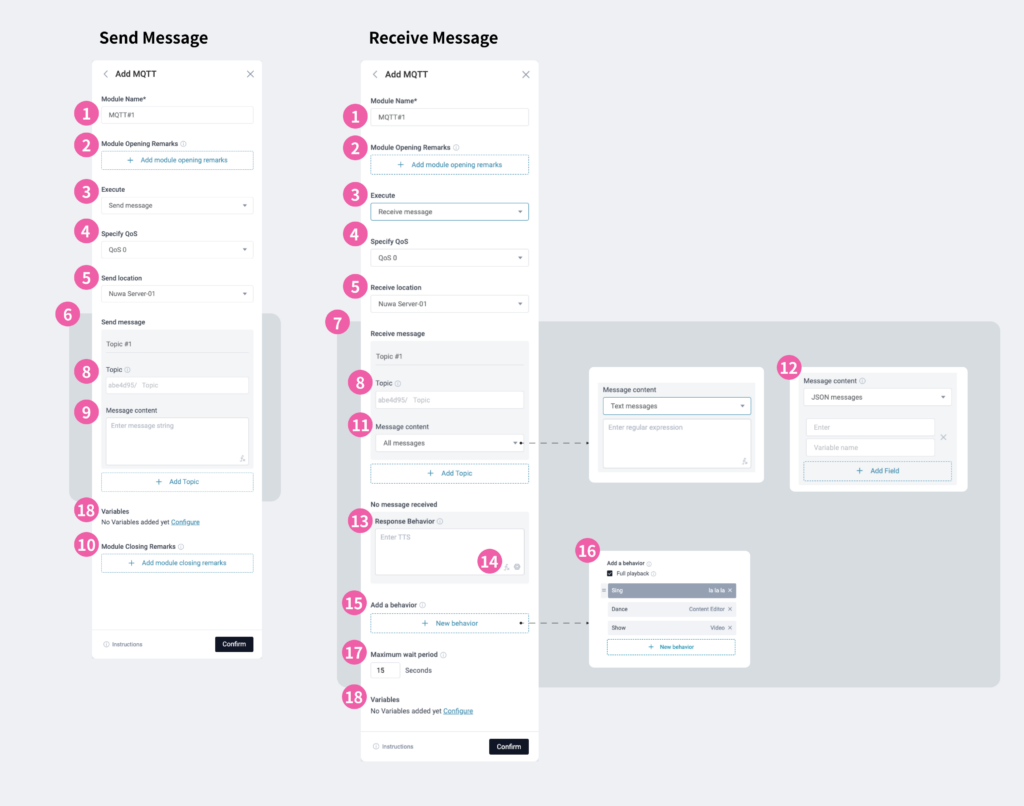
③ Execute: Choose “⑥ Send Message” or “⑦ Receive Message.” Fields change accordingly.
④ Specify QoS: Select QoS 0, QoS 1, or QoS 2.
⑤ Send/Receive Server: Choose a server. To add a new server, go to “Roflow Library | MQTT Server.”
⑥ Send Message: Input one or more “⑧ Topics” and their “⑨ Message Content.
⑦ Receive Message: Subscribe to one or more topics and select “All Messages” or “Specific Messages.”
⑧ Topic: Format:
– NUWA Server: Automatically prefixes with the user’s login account.
– Rules: Case-sensitive, meaningful UTF-8 characters.
– Do not use symbols like $, #, +, *, or spaces.
– Customizable hierarchy.
– 1–4096 characters.
⑨ Send Message | Message Content: Required when sending messages.
⑩ Module Closing Remarks: Optional for sending messages; not applicable for receiving.
⑪ Receive Message | Message Content: Choose “All Messages,” “Text Messages,” or “JSON Messages.”
⑫ JSON Messages: Fields can only be entered in English, symbols. _ [ ] or numbers, please refer to How to set up JSON message for an example.
⑬ No Message Received | Response Behavior: Define Behaviors when no messages are received within the max wait time.
⑭ Advanced Settings: Configure robot speech language, actions, expressions, or images.
⑮ Add a behavior: Add 0–20 robot actions/media files for sequential playback. Default robot expression is used if none are added.
⑯ Full Playback: If checked, all actions/media are fully played, even if messages are received before completion.
⑰ Maximum Wait Period: Specify wait time (3–999 seconds). If no messages are received, the system moves to the next module.
⑱ Variables: Add variables to this module.
JSON Message Configuration
Robots use getDouble or getString methods to retrieve and store JSON data into variables based on the data type (Number or String). Examples:
- field_name
- field_name.next_layer
- field_name[0]
- field_name[0].next_layer
JSON Data
{
“name”:”Will”,
“info”:{
“weight”:68.5,
“age”:42,
“address”:[
“AAA”,
“BBB”
]
},
“educations”:[
{
“degree”:”master”,
“major”:”Computer Science”
}
]
}
We have created the following variables:
•Name: String
•Age: String
•Address: String
•Degree: String
•Weight: Number
They can be assigned as follows:
•Assign the field name to the variable Name.
•Assign the field info.age to the variable Age.
•Assign the field info.address[0] to the variable Address.
•Assign the field educations[0].degree to the variable Degree.
•Assign the field info.weight to the variable Weight.
Basic Movement
This module cannot be used if the project is configured for the Collibot model.
① Module Name: Displayed on the module card; customizable for easy identification.
② Module Opening Remarks: Set one or more Module Opening Remarks for the robot to say sequentially.
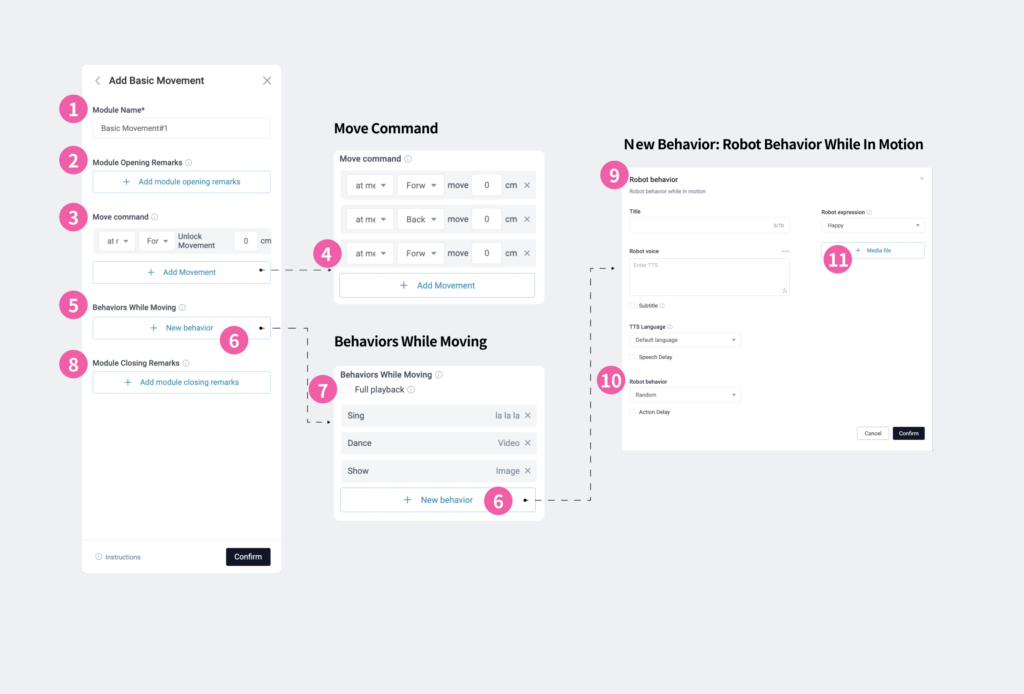
③ Move Commands: Add 1–20 movement commands, executed sequentially from top to bottom. Each command can specify speed, direction, and distance.
④ Adjust Command Order: Drag and drop to rearrange the execution order.
⑤ Behaviors While Moving: Add 0–20 robot actions or media files to play during movement. If not set, the robot will display its default expression.
⑥ Add New Behavior: Add “⑨ Robot Behavior While In Motion”
⑦ Full Playback: Normally, playback stops when the robot reaches its destination. If checked, all actions or media files will finish playing before proceeding.
⑧ Module Closing Remarks: Set one or more Module Closing Remarks for the robot to say sequentially.
⑨ Robot Behavior While In Motion: Specify robot actions and attach media files. For dual-screen setups, the robot’s screen displays the configured expression if a media file is selected.
⑩ Robot Behavior: Choose “None” for the robot to remain still during movement.
⑪ Media File Type: Attach either an image or video.
Indoor Positioning Movement
Exclusive module for service robots (Collibot model).
① Module Name: Displayed on the module card; customizable for easy identification.
② Module Opening Remarks: Set one or more Module Opening Remarks for the robot to say sequentially.
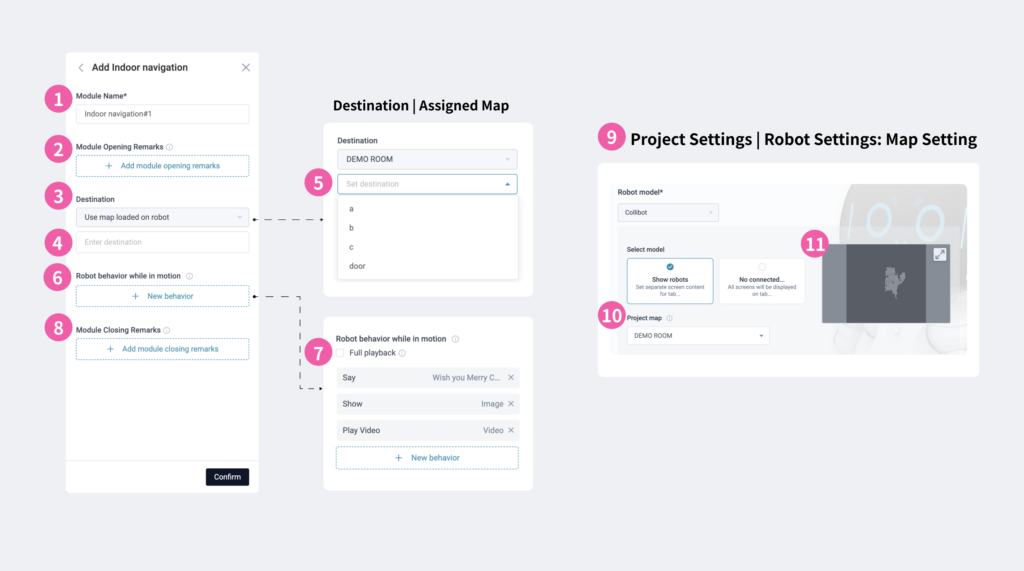
③ Destination: Use map information configured in the project to select a destination landmark. Each project can use one map or “Robot Map.” Changes to map settings must be made in “Project Settings | Robot Model ⑨.”
④ Use Map Loaded on Robot | Enter Destination: Manually enter a landmark name. This field supports variable input.
⑤ Assigned Map | Select Destination: Choose an existing landmark on the Assigned Map as the destination.
⑥ Robot Behavior While in Motion: Add 1–5 robot actions or media files to play during movement. If not set, the robot will display its default expression.
⑦ Full Playback: Normally, playback stops when the robot reaches its destination. If checked, all actions or media files will finish playing before proceeding.
⑧ Module Closing Remarks: Set one or more Module Closing Remarks for the robot to say sequentially.
⑨ Map Configuration: Set project maps in “Project Settings | Robot Configuration.”
⑩Project Map (Collibot):
• If “ Map Loaded on Robot” is selected, customize landmark names from the robot’s internal map.
• For multiple robots with identical landmarks, the same project can be shared without downloading/changing the map.
• If “Assigned Map” is selected, the map must first be downloaded from the Roflow Library, and only existing landmarks on the map can be selected.
⑪ Preview Map: Magnify and preview the map if “Assigned Map” is selected. “Map Loaded on Robot” does not support preview.
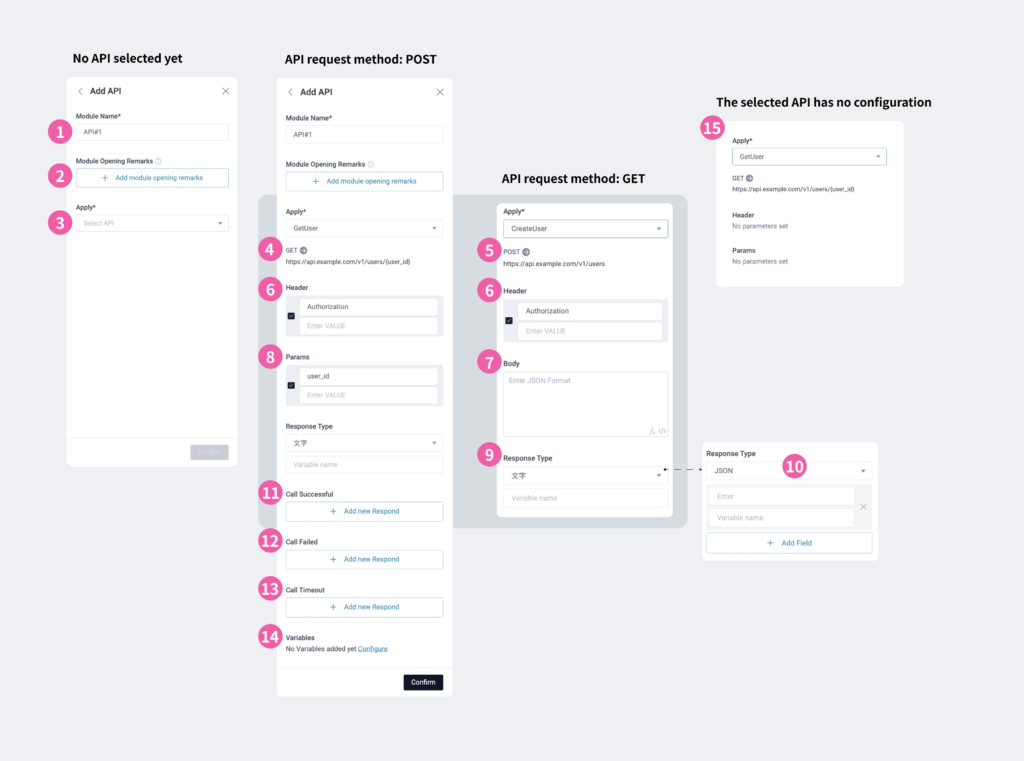
API
This module requires adding API data in the Roflow Library before usage. For optimal implementation, users should have relevant knowledge or professional assistance.
① Module Name: Displayed on the module card; customizable for easy identification.
② Module Opening Remarks: Set one or more Module Opening Remarks for the robot to say sequentially.
③ Apply API: Select the desired API for this module. APIs must be added to the Roflow Library beforehand.
Different settings according to the API request method of POST/GET.
④ Apply API (GET): Configure Header and Params.
⑤ Apply API (POST): Configure Header and Body.
⑥ Header: Select applicable headers. Input KEY and VALUE as needed.
⑦ Body: Enter JSON data or include variables. Click the bottom-right button </> to format JSON text.
⑧ Params: Select applicable Params. Input KEY and VALUE as needed.
The result return format can be Text/JSON.
⑨ Response Type | Text: Specify the variable name for the response.
⑩ Response Type | JSON: Input fields and corresponding variable names. Add multiple fields as needed.
⑪ Call Successful: Optional. Specify Behaviors for successful API calls.
⑫ Call Failed: Optional. Specify Behaviors for failed API calls.
⑬ Call Timeout: Optional. Specify Behaviors for API call timeouts.
⑭ Variables: Add variables to this module.


