Roflow
Whether you are uploading, importing files or data from other NUWA BizTools, it will all be compiled in the Roflow Library, which helps you systematically and efficiently categorize and manage all of your resources in the main categories:
Media & Tools
Manage Contacts
Recognition Models
Dialogue Model
Audio Q&A Corpus
MQTT Server
Manage Maps
Manage API
“Media & Tools” and “Manage Contacts” are available to all users, while the remaining categories are part of the PLUS advanced features. Additionally, “Manage Maps” is exclusive to Collibot models.
Manage pictures, videos, sounds, actions, and files of NUWA BizTools.
🤔 How do I add a NUWA BizTools file?
Choose either ‘Upload a file’ or ‘Import from tool’.
The latter requires that you have access to these tools (Code Lab/Content Editor/Brevity/Quiz Editor) in order to use this feature.
🤔 How do I replace files?
If you are using a file in several different projects, you can use the “Replace File” function in the Roflow Library to update the files in one go. Check the file you want to update and click the “Replace File” button at the bottom left of the screen to upload the new file.
Add and edit contact information to enable robots to provide more precise, personalized services through facial recognition training. Use this section to manage contacts, add new entries, and train facial recognition data.
🤔 How to Add Contact?
Click the ”+” Add button in the upper right corner of the page, then select:
• Add Contact: Add a single contact entry.
• Batch Import: Add multiple contact entries by downloading the sample contact list file, editing it, and uploading it according to the upload specifications.
Add New Contact|Contact Information
Includes information such as “Basic Information” and “Photos for facial recognition training”. If facial photos are uploaded, the system will automatically begin training after saving the new entry
① Name: My name and first name are required.
② Title: Required
③ Profile Photo: The profile photo will be displayed in the personnel list for easy identification. Uploaded photos will be automatically cropped into a circular shape. Recommended dimensions:
• Minimum: 300 x 300 pixels.
• Supported formats: jpg, jpeg, png.
④ NUWA Contact Number: For use with the NUWA “Contact System”, please enter a 10-character combination of a capital letter and a number.
⑤ Tags: Add one or more tags to easily identify and categorize people.
Whenever facial photo data is uploaded or updated, the system will automatically begin training and refresh the training results every 30 seconds. To view the latest training results in real time, click the “Update Training Results” button in the upper-right corner of the “Contact List” page.
Manage charging dock and navigation points for various fields, enabling the robot to move based on maps and complete cargo tasks. This requires the Collibot model and the NUWA Map development tools.
🤔 How to Add a Map
Once you create a map using the NUWA Map development tool, you’ll receive a corresponding ID to download the map.
① + Add: Click to open the download window.
② Download map: Select the map based on your device group. Note that the map must first be created and saved on the robot before downloading.
③ Edit map: Click the field to open the map details page and configure map sharing.
🤔 How to Update Maps
If a map is used across multiple projects, you can update it in bulk using the “Replace Map” function in the Roflow Library. Select the maps you want to update, then click the “Replace Map” button at the bottom left of the page to download the updated map.
💡 Note on Updating Maps
To enhance user control, maps in the Roflow Library do not automatically sync with updates made on the robot or in the “NUWA RMS Portal|Robot Manager|Map Resource Library.” You must manually update the maps in the Roflow Library, allowing you to decide when and which maps to update.
Manage your imported Teachable Machine recognition training files.
Teachable Machine is an open-source tool developed by Google. It requires no programming experience, allowing anyone to train AI object models through a computer’s webcam. It enables the quick and easy creation of machine-learning models.
🤔 How to Add a New Image Recognition Model
1. Train at least three “classes” in the Teachable Machine.
2. Export the trained model using the “Tensorflow Lite” format and ensure it is in the “Quantized” format.
3. The model name will automatically use the file name. If the name is duplicated, you will be asked whether to replace the existing model.
🤔 How to Replace Files
If a file is used across multiple projects, you can update it simultaneously through the “Replace File” feature in the resource.
• Select the files you want to update.
• Click the “Replace File” button at the bottom left of the page and upload the new file.
⚠ Note: After replacing a file, you must reselect the corresponding recognition items in the modules.
Using ChatGPT to Guide Interaction Based on Intent
1. The robot must support the AI Plugin feature to use this functionality.
2. Create your model in the Roflow Library and select it within this module.
🤔 How to Add a Conversation Model:
Click the “+Add” button in the upper-right corner of the page and choose one of the following options:
1. Add Model: Create a single conversation model.
2. Import Model: Download the sample file, edit it directly in Excel, and upload it. The file includes sub-pages with detailed instructions. Each sample file allows you to define one conversation model.
Add Dialog Model
① Model Name: Enter the name of the model.
② Branching Options: Add one or more options to each model, each with a corresponding descriptive text.
③ Option Name: Provide a brief title summarizing the topic.
④ Description text: Clearly and concisely describe the features of each option. Follow proper prompt-writing techniques by making the description specific, clear, and unambiguous. Avoid overly complex or vague language. Ensure sufficient differentiation between options to improve accuracy.
⑤ Sharing Settings: Allow the resource creator to adjust resource-sharing settings in the Roflow Library. Selecting “Myself” is mandatory.
Import/Export expected reply corpus for Audio Q&A module for efficient reuse.
🤔 How to Add Audio Q&A Corpus
Click the “+ Add” button in the upper-right corner of the page, then choose one of the following options:
1. Add a Single Corpus: Click to open the Add/Edit page.
2. Import Data: Download a sample file, edit it directly in Excel, and upload it. Detailed instructions can be found on the subpages within the file. Each sample file can include reply content for one set of data.
Adding New Audio Q&A Corpus
① Corpus name: Enter the name of the corpus.
② Expected Response: One or more new corpus responses can be added to each corpus, and each corpus response can be assigned a corresponding robot response.
③ Corpus response name: You can customize the name for each corpus response.
④ Listening for keywords: The robot will only respond when it hears content that exactly matches the keywords. Adding multiple keywords can improve accuracy.
⑤ Response Behavior: After matching a keyword, the robot will reply with the specified response. Variables can be entered here, but the specific values and definitions will depend on the imported project.
Manage Frequently Used Server Lists for Easier MQTT Module Configuration.
In addition to the default “NUWA Server,” you can add other third-party servers.
🤔 How do I add a Third Party Server?
Click the “+Add” button at the top right of the screen to open the Server Information dialog box and fill in the basic information:
① Server Name: Required
② Server Location: Required, you can choose whether to encrypt (TLS) or not.
③ Connection Port: Required
④ Account: Non-required; enter English, numbers, or semi-colons; do not use single/double quotation marks and spaces.
⑤ Password: Optional: enter English, numbers, or semi-colons; do not use single/double quotation marks and spaces.
📔 About NUWA MQTT Server
The information about the NUWA MQTT server cannot be edited or deleted, and is detailed below.
Name:NUWA
Broker Address:public-mqtt.Nuwarobotics.com
TCP Port:1883
TLS Port:8883
WebSocket Port:80
WebSocket Port over TLS:443
WebSocket URI:/mqtt
Topic Prefix:Username/, e.g. Username is kebbi, topic should be: kebbi/ YOUR_TOPIC_NAME
Message Retention:YES
Persistent Session:YES
Sign Up Requred: YES
Manage Frequently Used API Lists for Easy API Module Configuration
Before adding an “API Module” to your project, you must first create API data here.
How to add API
Click the “+ Add” button in the upper-right corner of the page to open the API details page and provide the following information:
① API Name: Required. Names must be unique and have a maximum of 90 characters.
② API URL: Required, you can choose the request method as POST/GET.
If the request method is POST, you need to fill in:
③ Header: Optional. Add one or more KEYs.
If the request method is GET, you need to fill in:
③ Header: Optional. Add one or more KEYs.
④ Params: Optional. Add one or more KEYs.
⑤ Timeout: Set a timeout range (30–999 seconds). Exceeding this time will result in a timeout, stopping the API call.
⑥ API Description: Optional. Enter a note (up to 200 characters).
⑦ Share Settings: Share the API with members of your device group, allowing them to view/edit it in the resource.
Once a file has been uploaded to the library, it is by default only visible to you (myself, the creator of the resource), but you can share the resource with other members of your group through the sharing settings.
Media & Tools, Recognition Models, Audio Q&A Corpus, Dialogue Models, MQTT Server, Maps, APIs
When downloading maps, they are automatically shared with groups that were specified as shared during the original map creation and where the downloader is a member. Due to privacy and security considerations, sharing settings for “Personnel” are currently not allowed.
Sharing Settings|Resource List Settings
① Resource creator: You can filter the content according to the creator of the resource.
② Sharing Status: You can filter the content according to the sharing status of the resource.
③ Sharing Settings: You must be the creator/uploader of the resource to set sharing settings. If you want to select more resources to set up sharing, the “Sharing Status” of all resources must be the same (e.g., all resources are “Not Shared” or all resources are “Shared: View Only,” etc.).
④ Shared members: Can be shared to the group of devices that you have joined.
⑤ Shared Member Range: If you enable the editing rights, other shared members will be able to re-upload (replace) or delete this resource. Please note that this will affect other projects that are also using this resource.
Shared Settings|Individual Resource Settings
As a resource creator (uploader), in addition to selecting a resource to set up sharing in the Resource List, you can also set up settings in the Edit/Detail Page for Individual Resources. For example, when you open the editing page of a dialog model, you can see the “Sharing Settings” field.
① Shared members: You can share the settings to the group of devices that you have joined.
② Other Members Permissions: After enabling sharing with other groups, a toggle button will appear in the upper right corner, allowing you to specify whether shared members are permitted to edit this resource. Please note that if editing permissions are enabled, other shared members will be able to re-upload (replace) or delete this resource, which may impact other projects that are also using this resource.
Since projects may use multiple resources created by different members, it’s important to consider the sharing permissions of these resources, as they will impact or limit the scope of project sharing.
If you use the PLUS Team Edition (with a NuwaTeam account), you can use the sharing function to share your project with others. The following options are available:
• Shared Settings: Supports sharing of projects by members of the same team.
• Download Project: Supports sharing projects between different teams.
If you have not yet upgraded to a NuwaTeam account and would like to learn more or try it out, please contact our sales team at biz.service@nuwarobotics.com
On the “My Projects” page, click the “…” button in the bottom-right corner of the project, then select “Sharing Settings.” Choose the team groups or members you want to grant viewing access to, and click “Save” to complete the sharing setup.
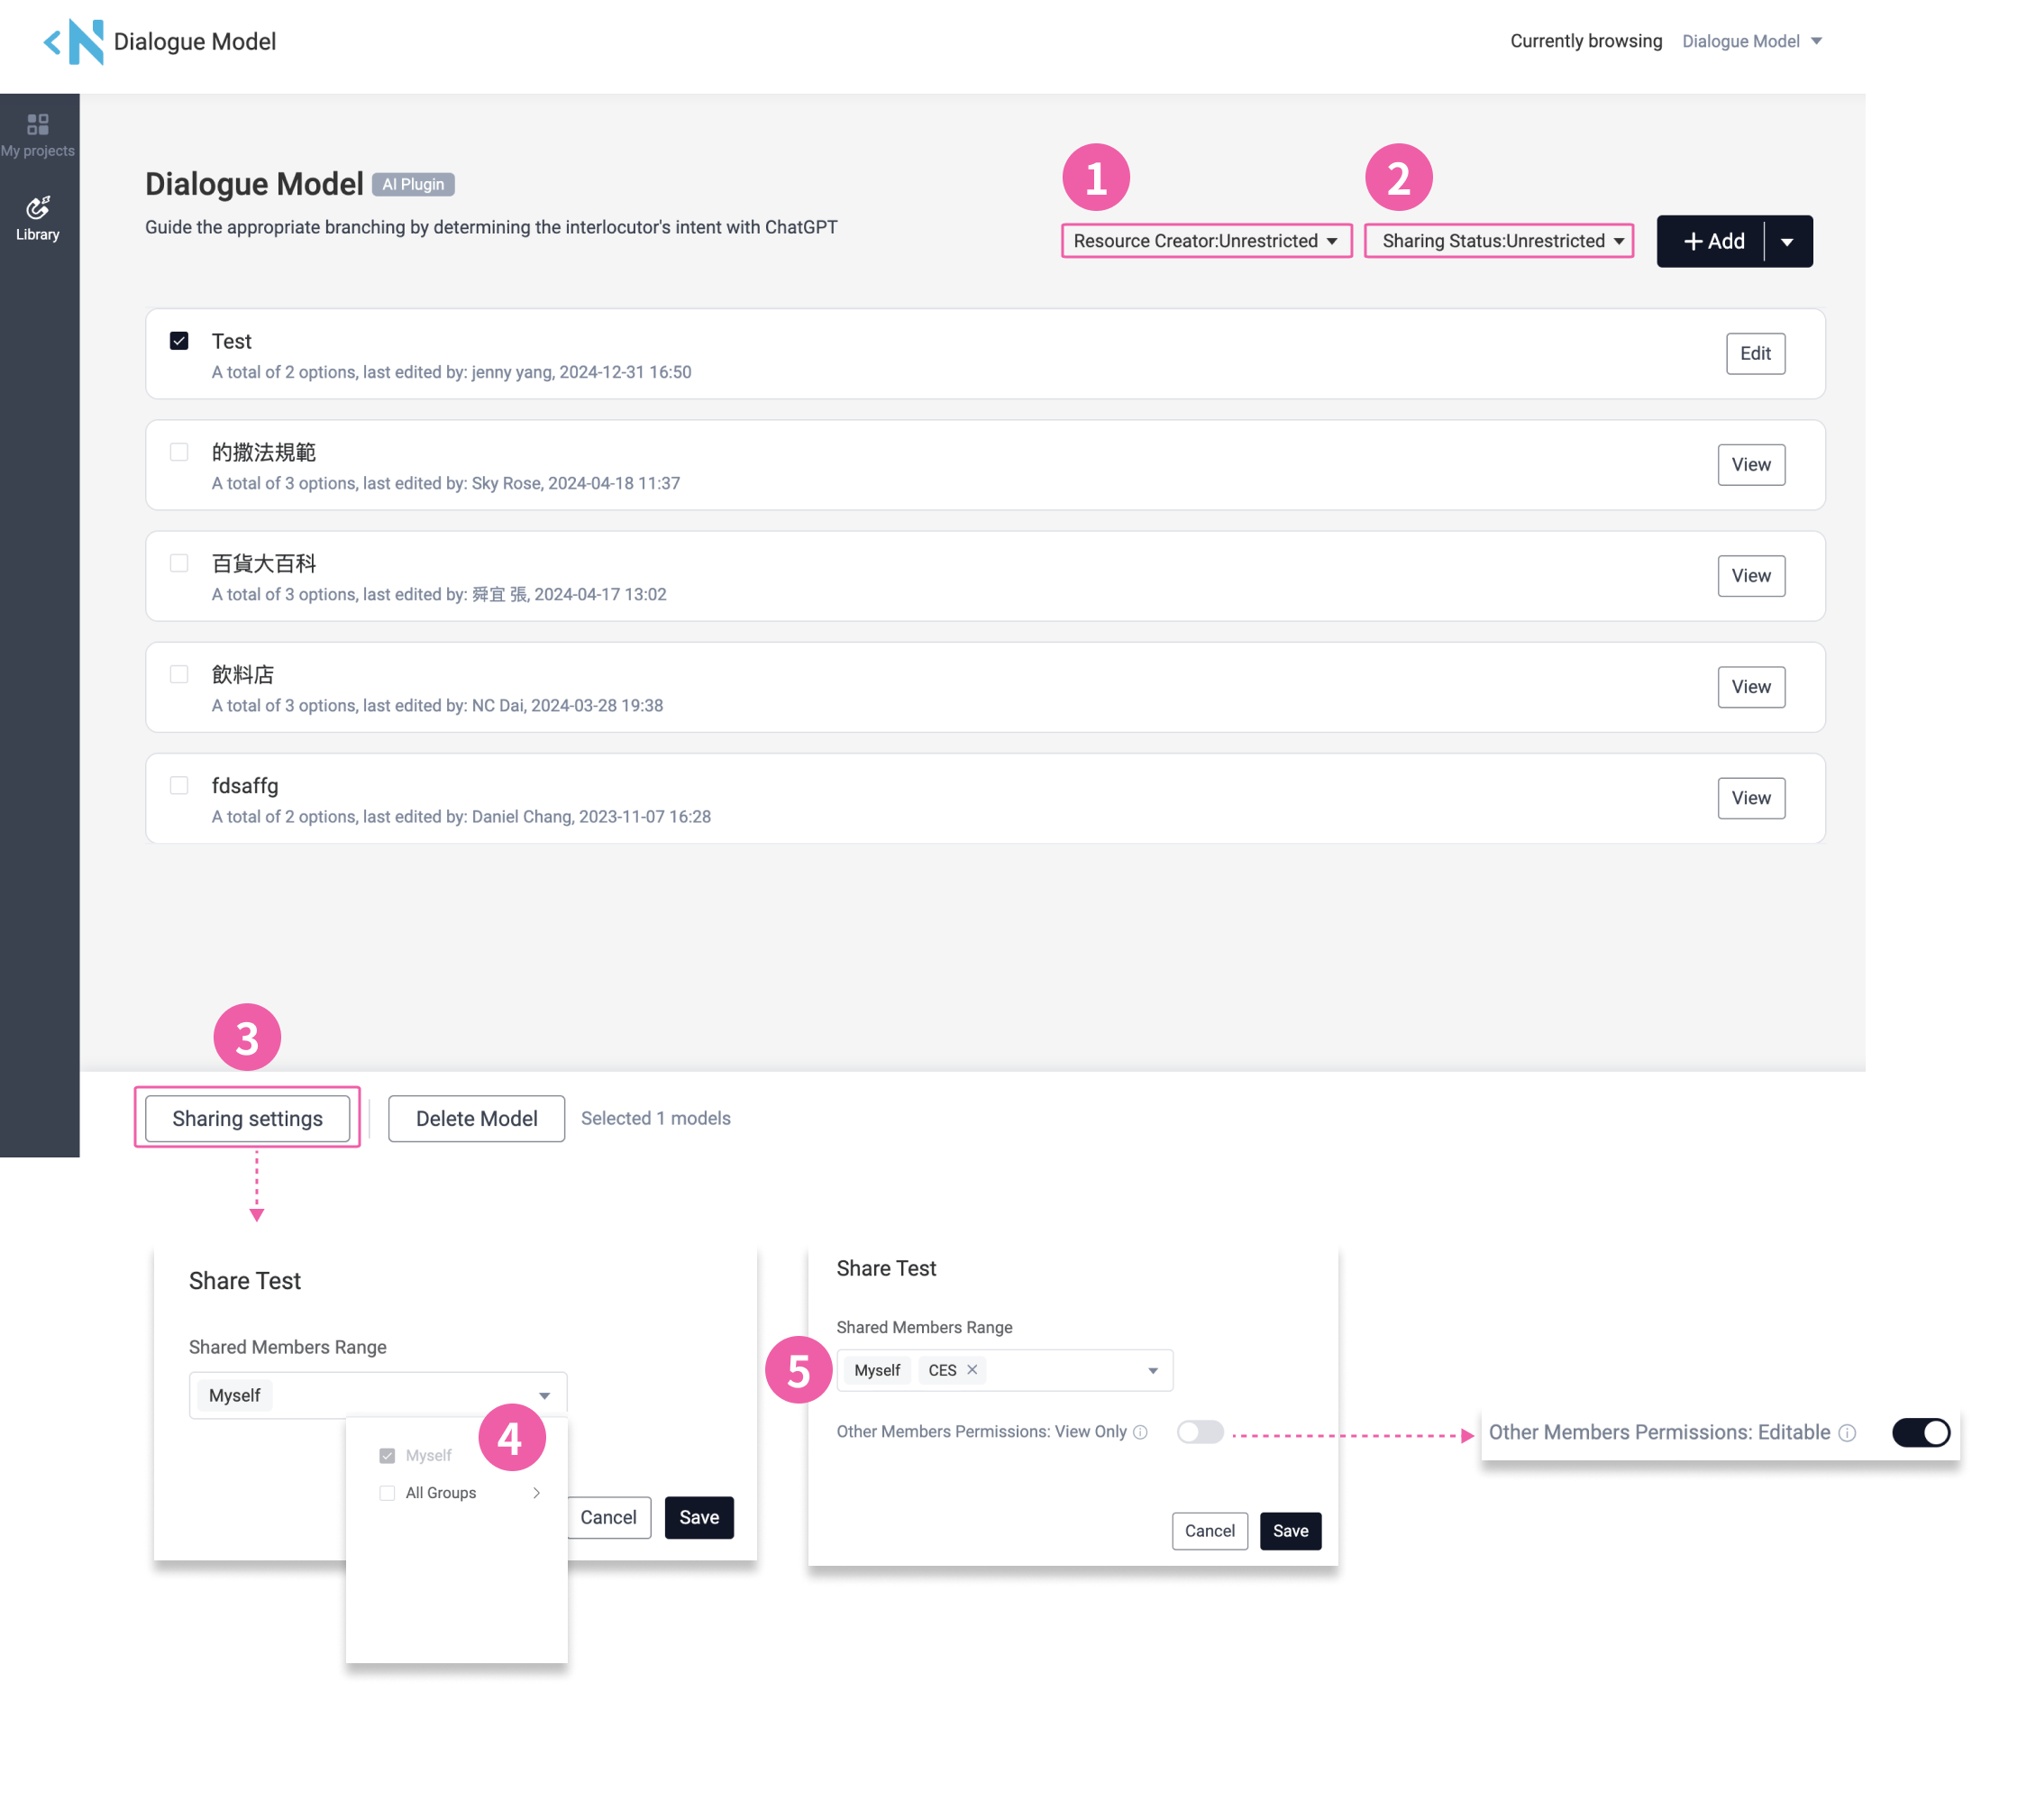
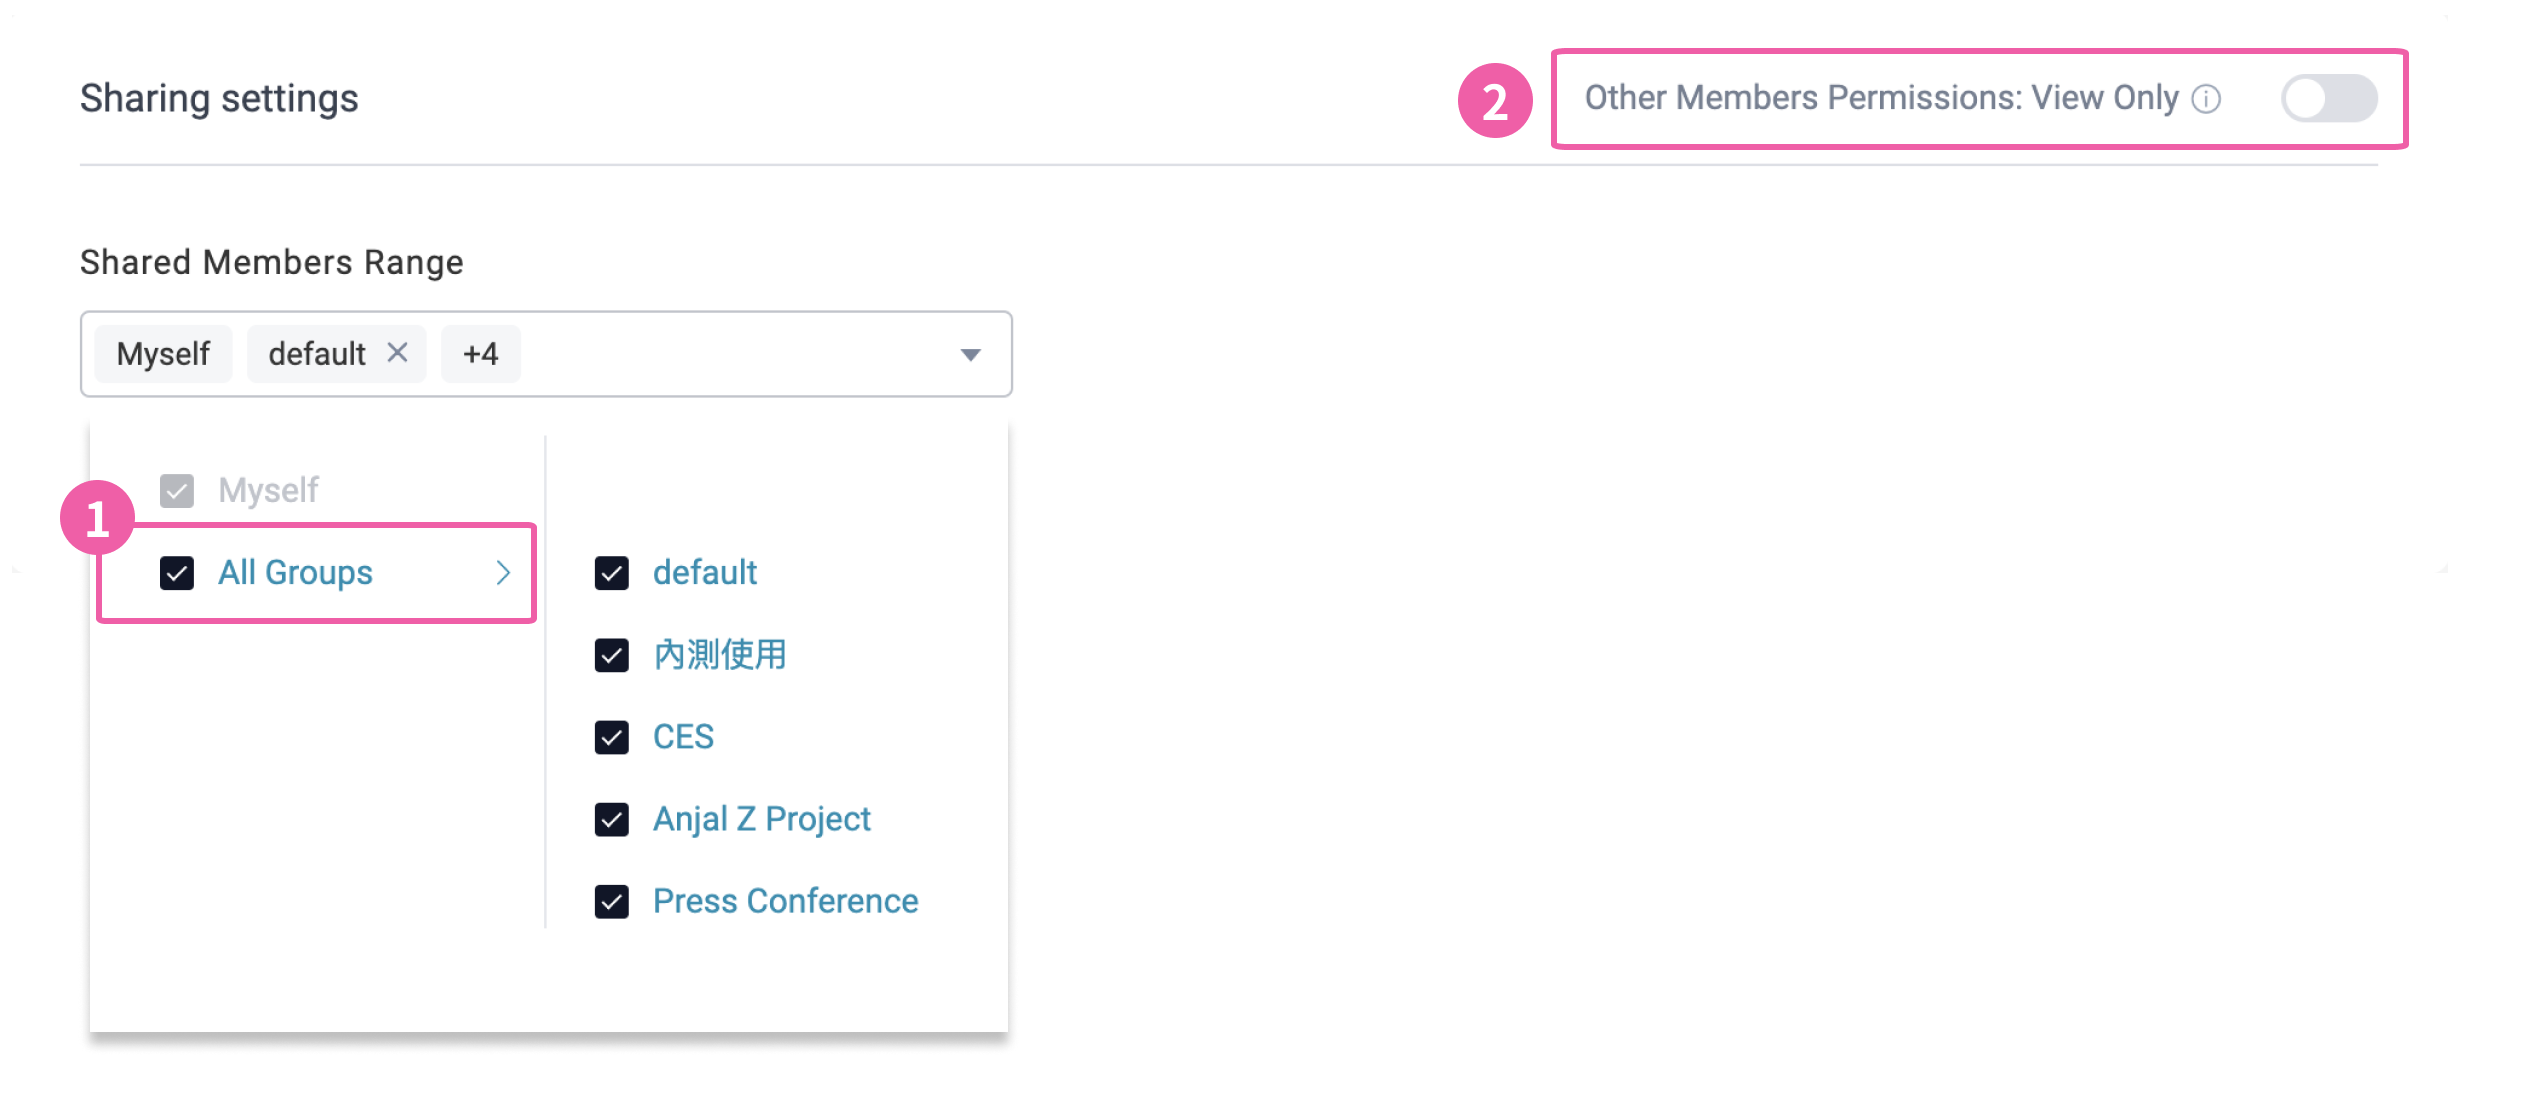
Sharing permissions are divided into three levels:
1.Group Sharing | View Only: Select the group members you want to share the project with, granting them viewing rights only, without editing permissions. Refer to point ①.
2.Group Sharing | Editable: After selecting the group for sharing, enable editing permissions via the menu on the right. Refer to point ②.
3.Individual Sharing | Editable Members: If you want to allow only specific members (users) to edit, first grant the group they belong to viewing rights. Then, in the sharing status menu, select “Add Editable Member,” and enter the member’s email to add them. Refer to point ③.
The sharing status menu provides three main functions:
1.Display Sharing Settings Status: If no editing permissions are enabled for the added view-only groups, the status will display as “Editing Rights: Disabled.” Refer to point ②.
2.Add Editable Members: Grant editing permissions to specific members. Refer to point ③.
3.Disable All Editing Rights: Disable editing permissions for all groups/users with a single click. Refer to point ④.
Why Can’t I Set Project Sharing?
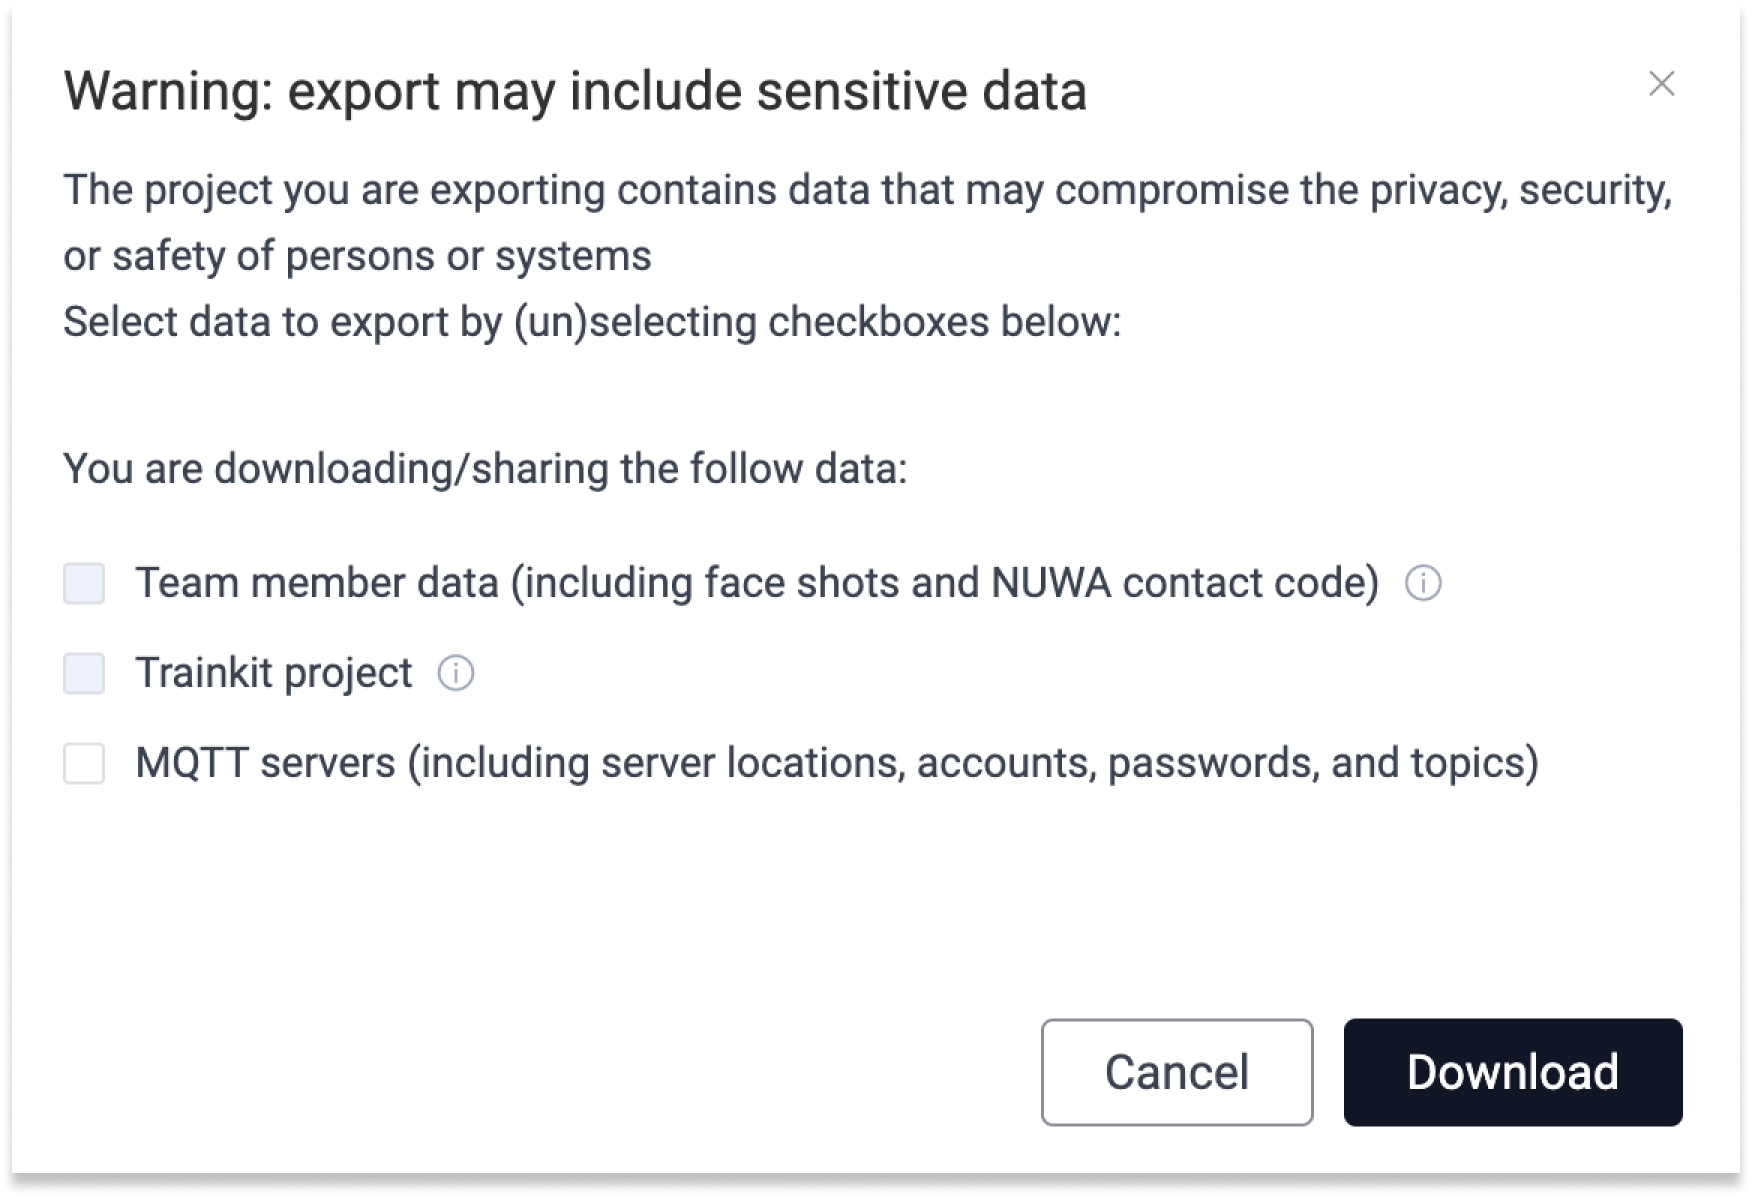
• Project sharing cannot exceed the sharing scope of the resources used within the project. For more details, see the section on Resource Sharing Rules.
• If a member is only in Group A, you cannot grant editing permissions to that member if the project is shared only with Groups B and C.
On the “My Projects” page, click the ”…” button at the bottom right of the project, and select “Download Project”. If the project contains sensitive or private data, a prompt will appear to prevent potential security risks. You can deselect the data to exclude it from the download. Types of private data that may require attention include:
First of all, please check whether the network connection status of your computer/network is unstable or disconnected; if the network connection is normal, please refer to the following possible reasons and suggestions (if some modules are not filled out or the resource files are missing, you can still download the project, or troubleshoot the problem first before downloading).
PLUS Team Edition program expires
The function of downloading/uploading projects is only available for Team Edition (with NuwaTeam account).
Therefore, if your plan has expired and has not been renewed, you cannot use this function. To download the project, please upgrade the plan again.
Powered By EazyDocs