This section provides a detailed introduction to the fields and usage of variables.
Add Variables
As long as you are a PLUS Pro or PLUS Team user of Roflow, you can use the variables feature.
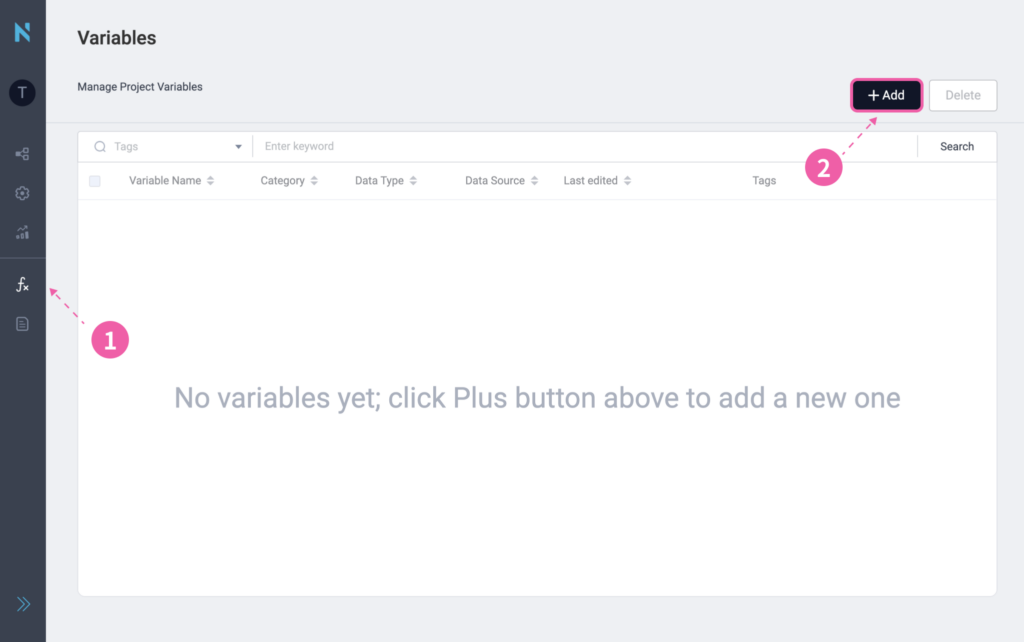
In the left sidebar of your Roflow project, click ① Variable to open the Variable list and manage all variables in the project. If you do not have any set variables when you first start using Roflow, click the ② “Add” button on the upper right side of the screen to start adding new variables
💡 You can add up to 100 variables in one project.
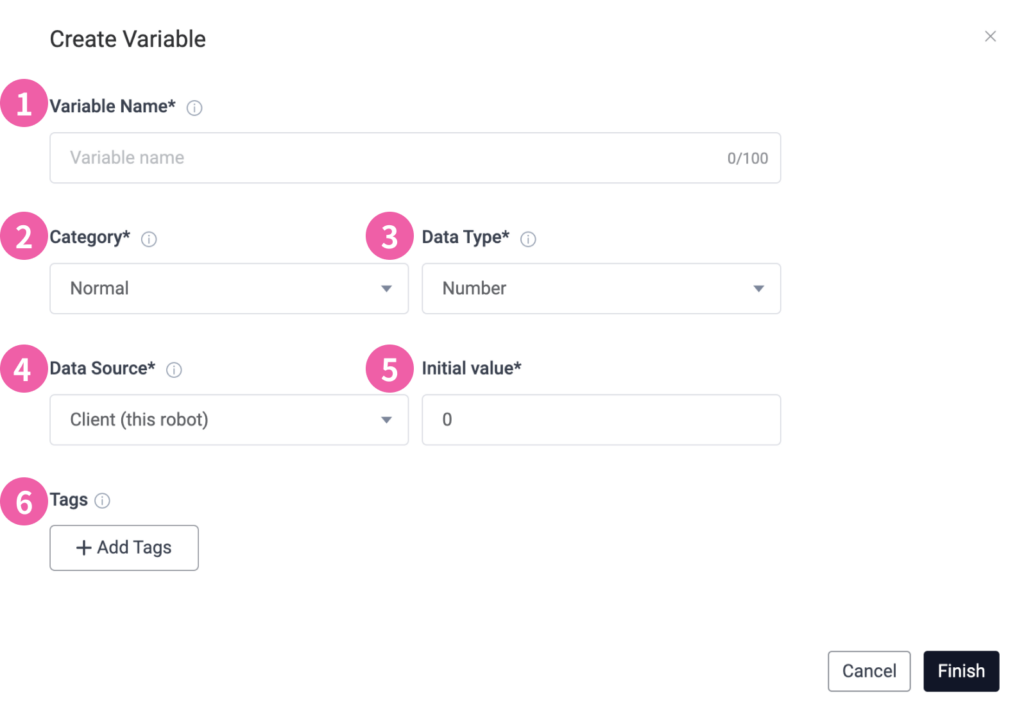
You need to fill in the following fields when you add a new variable.
① Variable Name: The name assigned to the variable. Follow these naming guidelines:
• The first character must be a letter. Uppercase and lowercase are treated as distinct characters.
• Only letters, numbers, and underscores (_) are allowed.
• Variable names must be unique within the same project and cannot duplicate other variable names (this restriction does not apply across projects).
• Avoid excessively long names, as they may not display fully during operation.
• Once a variable is added, its name cannot be changed.
② Category: Currently, only the “Normal” type is supported.
③ Data type: Choose a Number or String based on the type of data to be collected.
④ Data source: Select either the Client (this robot) or the Remote Server.
• Client: Refers to data generated on the device during user interaction.
• Remote Server: Refers to data received in real-time from a specified server.
If a server has not been configured for the project, go to Project Settings|Variable Storage Location to set it up. Specify the path if selecting a server other than the NUWA Server.
💡 If multiple variables use the same path, the system will notify you. You can decide whether to adjust the path based on your usage needs.
⑤ Initial value: Define the default initial value for data calculations based on the chosen Data Type.
• For Number, the starting value must also be numeric.
• For String, the starting value can be a number, a text string, or left blank (null).
⑥ Label: Optional. Up to 10 labels can be assigned to each variable to help with identification. You can add, delete, or modify labels here.
💡 Note: Once added, the name, type, and data type of a variable cannot be changed.
Variable Management
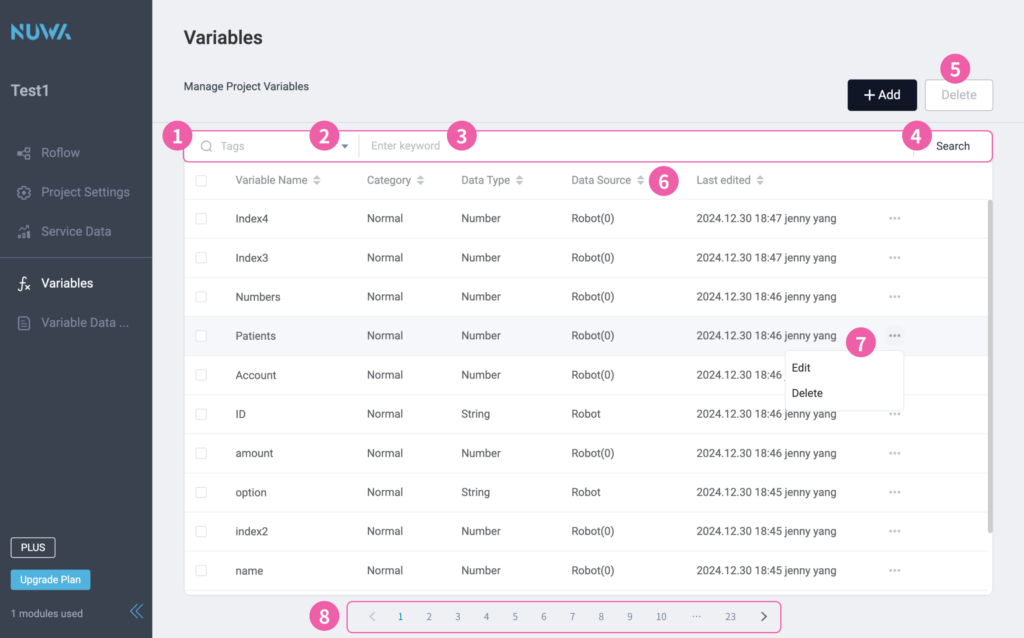
In the Variable list, you can browse and manage all the variables for this project.
💡 Each project manages its variables independently, and even if the variables have the same name, there is no association between the variables of different projects.
① Search for variables: Search in the list of variables for this project.
② Search by Tags: Input “tag keywords” to filter tags, and you can single/multiple select tags to search variables.
③ Search by Keyword: You can input “Variable Name Keyword” to search the variable regardless of whether there is a tag selected or not.
④ Search button: After specifying the search criteria, such as tags/keywords, click this button to start searching.
⑤ Delete: You can check multiple variables in the variable list to delete them.
⑥ Last Edited: The last edit time and the last editor of each variable.
⑦ Edit: Edit or delete a variable.
⑧ List Tabs: If there are multiple entries in the list of variables, they will be displayed in separate tabs. Tap the code or the left/right buttons to toggle through the tabs.
Adding Variables to Modules
After adding variables, you can incorporate them into various modules of the service workflow to collect data generated from interactions between the robot device and end users. This data can then be used by subsequent modules to record specific information or perform assignments and calculations.
How to Use Variables in a Workflow?
Example 1: If Kebbi recognizes the person interacting with it, it can say the person’s name.
In the “Trigger Condition: Face detected” module, you can add a variable to record the name of the person detected by the robot. This variable can then be declared in subsequent modules, allowing the robot to mention the person’s name during a conversation.
Example 2: Design a questionnaire and record responses.
Use multiple “Forms” modules to create a questionnaire, with each module representing a question. You can add different variables to each “Forms” module to record the responses to specific questions.
Some modules on the robot can automatically store partial data. In addition to adding custom variables to modules, you can also access or declare “In-module Data Storage” during variable operations.
The following modules support “module-stored values”:
Trigger Conditions, Audio Q&A, Onscreen Menu, Forms, Recognition, AI Dialogue, and MQTT Modules.
Adding Variables in a Module: Using the Trigger Conditions Module as an Example
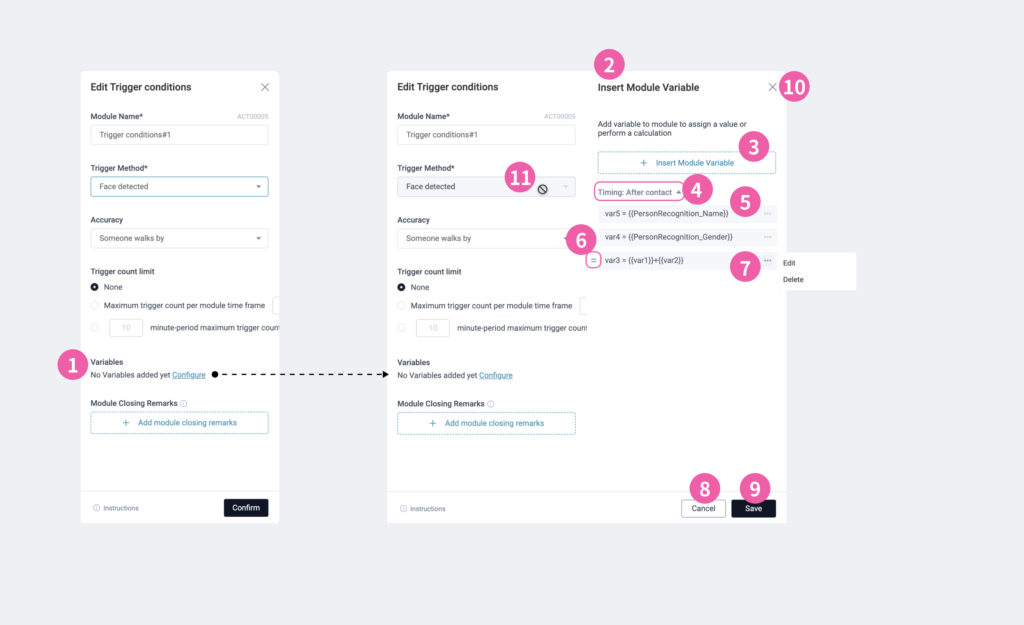
① Variables: Locate the “Variables” option in the module settings window, then click “Configure” to add a variable.
② Insert Module Variable: Clicking “Configure” will open this window on the right side to allow you to add variables.
③ Add Variable: Click the button to add a variable to this module. Refer to Variable Operations and Calculations for more details.
④ Timing for Adding: Expand/collapse this section to view all variable operations added for this timing.
💡 Multiple variables can be added for different timings within the same module.
⑤ Variable Operations: Each time a variable is added, a new variable operation (calculation expression) will be created.
⑥ Change order: Long press the bar icon and drag up and down to change the order of each variable operation.
⑦ Edit: Edit/delete a single variable operation.
⚠ Important: If this project has already been deployed, deleting any variable may affect existing data collection.
⑧ Cancel: Do not save this variable setting.
⑨ Save: Save this variable setting
⑩ Close Right Window: Closes the Add Variable window and does not save this edit.
⑪ Edit Restriction: When adding variables, you cannot change the settings of Trigger Mode, MQTT Message Receive/Send, and so on.
Variable Operation and Calculation
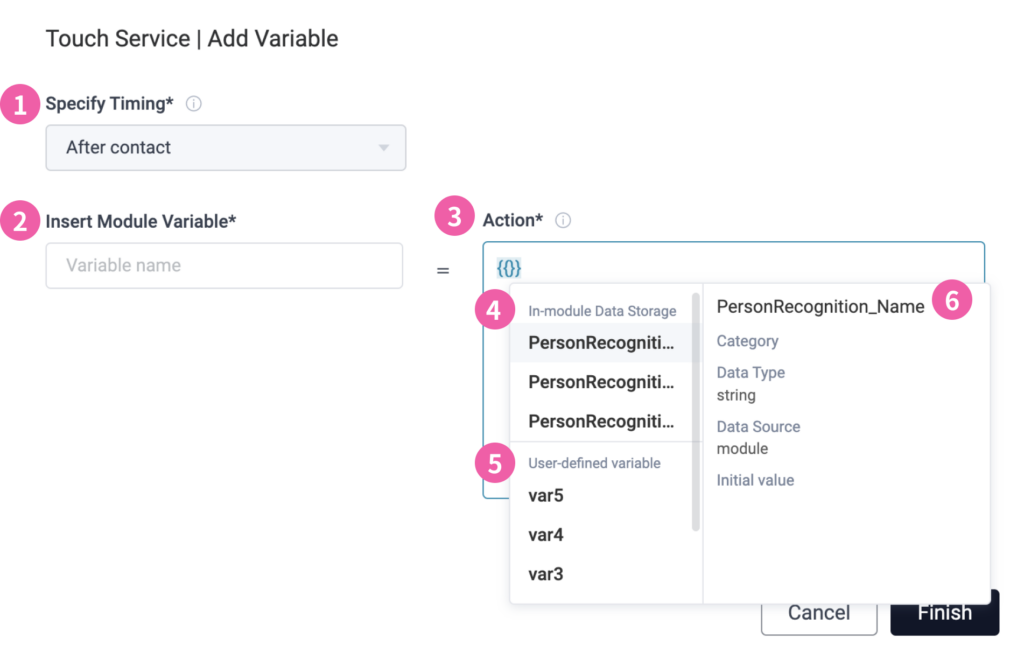
The following table describes how to define the variable operations in a module. Take the Trigger Condition module as an example.
① Specify Timing: Select the timing for adding the variable, there are different timing options for each module.
② Insert Module Variable: Select a custom variable.
③ Action: Enter “{{” to declare the variable and perform the assignment or operation. You can declare the module stored value/custom variable.
④ In-Module Data Storage: Some modules can pre-store certain data on the robot for retrieval or declaration. Each module has different stored values, but not all modules include stored values. For example, if the trigger condition is set to “seeing a person,” the robot can store preset data such as the person’s name, gender, and age.
⑤ User-Defined Variables: Select the variables you have already added to this project.
⑥ Variable Details: The right-side window will display detailed information about the variable currently highlighted by the cursor in real-time.
Variable operation rules
When performing an operation, enter “{{” to declare the variable and perform an assignment or calculation. There are different rules depending on the data type of the variable:
String Variables can be assigned values
(1) The variable is a String and can be concatenated directly with other strings or variables of type String.
(2) You can choose “Values provided by the module” to store into the variable.
Number Variables can perform calculations
(1) The variable is a Number and supports operations such as addition, subtraction, multiplication, division, and modulus (+, -, *, /, %).
(2) Variables must be enclosed in double curly braces {{ and }}.
(3) Expressions can only contain numbers (including decimals), operators (+, -, *, /, %), spaces, parentheses ( ), and variables enclosed in double curly braces, e.g., {{variableName}}.
(4) Parentheses ( ) can be included in expressions, and each opening parenthesis must have a matching closing parenthesis.
(5) Numbers cannot be placed immediately after a closing parenthesis or directly before an opening parenthesis.
(6) Numbers cannot end with a decimal point, nor can a decimal point be the starting character of a number.
(7) Expressions cannot start with a decimal point or operator (except for a negative sign).
(8) Expressions cannot end with an operator.
(9) The valid range for Number variables is -9007199254740991 to 9007199254740991
TTS field declaration variables
All the module’s opening/closing/Robot voice (TTS, Text to Speech) fields can announce the variable you have added, allowing the robot to read out the value stored in the variable.
In the Text field, type {{ or click fx in the lower right corner of the field to declare the variable.
Collecting of Variable Data
After adding or declaring variables in multiple modules, you can not only create more dynamic robot interactions but also enable the robot to accurately record variable data and upload it to the specified location.
Where to Upload Variable Data
You can specify whether you want to upload to the “NUWA Server” or to “Other Servers”. For more information on how to set this, please refer to “Variable Storage Location.”
How and when to upload variable data
Once a module in the process includes variables, you can insert a Data Upload module later in the workflow to customize which variables to upload and when to upload them.
Variable Data Central
Variable data uploaded to the NUWA Server is automatically displayed in the project’s “Variable Data Central.”
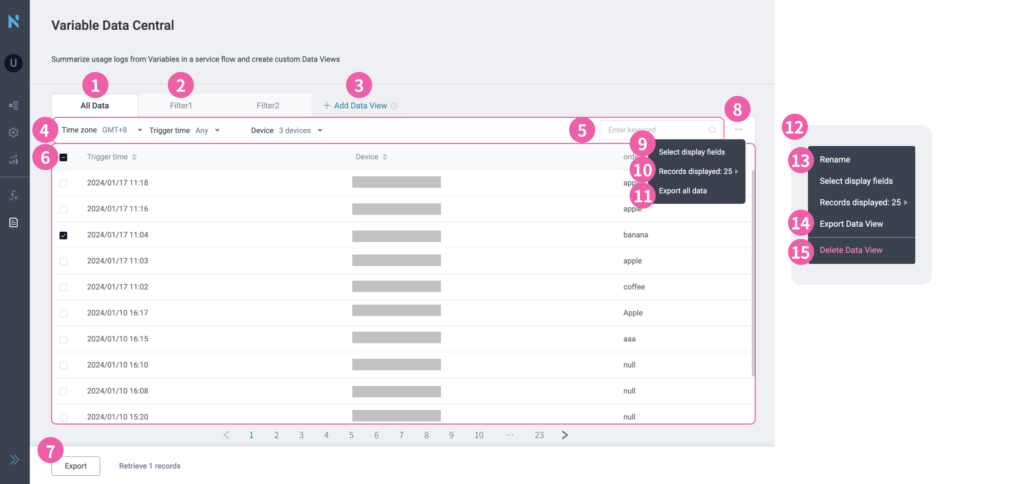
① All Data: Displays the latest variable data and the complete history of all variables in the project. This table cannot be renamed or deleted.
② View Screens: Filter and customize data viewing ranges. Multiple view screens can be created, renamed, or deleted.
③ Add Data View: Select specific content from “1. All Data” to create a sub-table for customized viewing.
④ Filter: Use time zones, trigger times, devices, and keywords to filter displayed data. Multiple filter criteria can be applied simultaneously. By default, the time zone is set to your login location. If the project is deployed across devices in multiple time zones, ensure to switch time zones accordingly.
⑤ Keyword Filter: Input specific keywords to narrow the data viewing range.
⑥ Variable Data: Shows the usage records of variables within the service process. Along with “Trigger Time” and “Device Name,” the results of the variables are displayed sequentially based on the execution order of modules containing variables in the project workflow.
⑦ Export: Select all or some of the data to export. Supported download formats: .csv, .txt, and .xlsx.
⑧ Edit|All Data: Configure the settings for the “All Data” form.
⑨ Setting Display Fields: Choose which columns to display.
⑩ Set Display Quantity: Adjust the number of entries displayed at a time—options include 10, 25, 50, or 100 entries.
⑪ Export all data: Export the complete content of the “All Data” table.
⑫ Edit|View Screen: Configure settings for a specific “View Screen” table.
⑬ Rename (View Screen): Edit the name of the currently viewed “View Screen” table. Names must be unique.
⑭ Exporting Data View: Export the complete content of the currently viewed “View Screen” table.
⑮ Delete Data View: Delete the currently viewed “View Screen” table. The data within this table will remain available in “1. All Data” or other view screens.
Setting Display Fields
Configuring Display Fields for “All Data” and “View Screens”
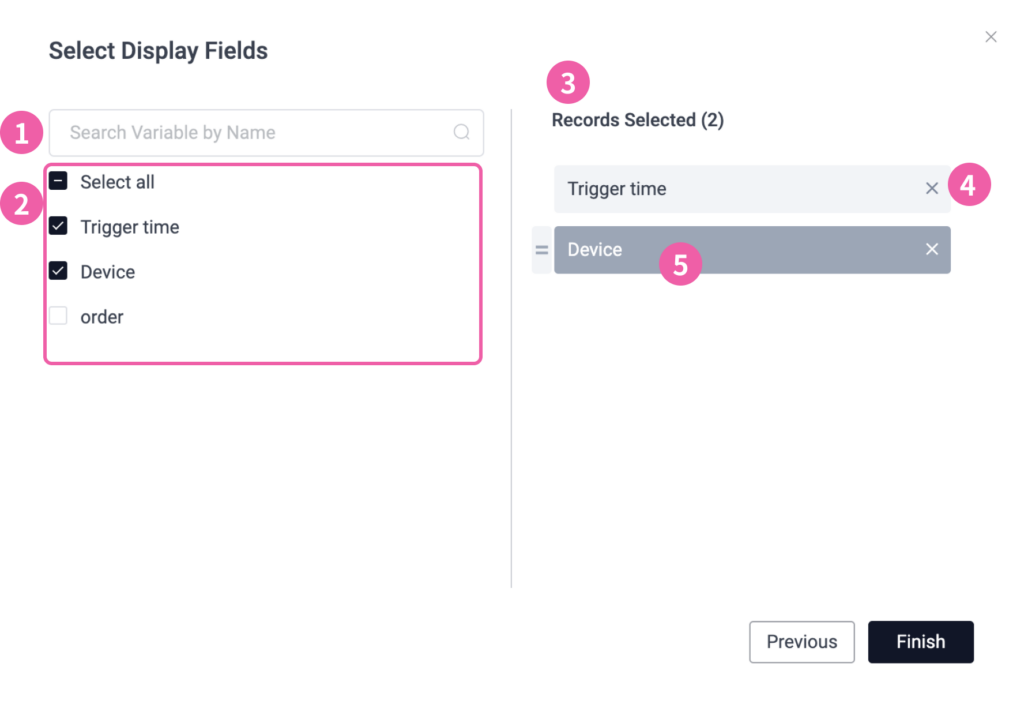
① Search Variable by Name: Enter keywords to search for variable names.
② Available fields: Lists all the fields of the currently setup form. Check the box to view the content, and the unchecked content will be hidden.
③ Records Selected: The selected fields will be shown here.
④ Remove: Click the “X” to deselect a field. The field will be removed from ③ “ Selected Fields” but can be reselected from the list on the left.
⑤ Drag and Rearrange: Long-press and drag up and down to adjust the order in which the field is displayed on the form (top to bottom, corresponding to the order of the form from left to right).


